In part 1 I said I’d get back to you in a week with part 2. Well that took a bit longer, as my wife gave birth to our daughter a bit earlier than expected so I took some time off work to enjoy family life.
After the brief introduction in part 1, let’s get into the weeds with SteelConnect.
Disclaimer: I work for Riverbed, all views and expressions on this blog are entirely my own and don’t necessarily reflect the views of my employer.
When asking my fellow technical peers in the industry what they think of when they hear SD-WAN, I often hear ‘direct internet breakout’ or ‘using the internet to access corporate applications’. Many organisations still backhaul all their traffic from branch sites to the data centre, then have it go trough a firewall before it’s sent out to the internet. Often works okay, and for a company that is big in WAN optimisation this is not a bad thing for us either, as it’s easy to enhance the the user experience in this use case.
With the rise of cloud services like Google Apps, SFDC, Office 365, ServiceNow and many others, the need for direct internet breakout has increased significantly. Backhauling this traffic via the data centre out to the internet has adverse performance effects, and the amount of traffic is often a burden for the (relatively) expensive, yet slower WAN links compared to the cheaper, faster internet links that are available in most sites, resulting in suboptimal user experience.
This use case is certainly a key driver for SD-WAN: leverage the internet by sending internet-bound traffic straight to the internet from a branch site, and by building secure overlay tunnels one can use that same internet to access corporate applications that reside in the corporate data centre. Important or high-priority, low-latency applications can still be steered over the corporate WAN link.
I obviously wouldn’t mention all of this if SteelConnect wouldn’t be able to do this, that wouldn’t make much of a blog post. That’s really only the start, as SteelConnect does much more:
- A key benefit of the SteelConnect portfolio is that it integrates really well with our WAN optimisation solutions, SteelHead. The SteelHead-SD does exactly that: one solution with our years of application intelligence combined with an SD-WAN gateway.
- SteelConnect devices are fully cloud managed through SteelConnect Manager, which makes management really easy and mitigates the need for additional local infrastructure.
- Zero-touch provisioning is a key feature: just plugin the cable into the WAN port of the device, and if there’s internet access the device will configure itself automatically. Using static IPs? No problem, phone USB tethering is supported to pull down the right config straight away.
- Want to send Facebook traffic always over the internet, but backhaul Skype traffic? No problem, with real-time visibility and application control per-application and per-user traffic steering is supported.
- Has latency, jitter or packet loss gone up suddenly for a site? We’ll automatically use the other available WAN links to minimise user impact, no manual intervention needed.
- One of the best things is that everything is configured through a GUI. I was skeptical at first as well, working at Cisco and Brocade in the past where I’d pick CLI over GUI any day. However, the GUI is intuitive and responsive which is refreshing, and easy to use.
- Benefit of that GUI is also that intelligent traffic steering is easy to use. No more tedious ACLs to configure via CLI, which often lead to a mess over time if not properly documented. SteelConnect uses GUI based policies, using human-readable logic. Want to block certain applications or websites? Easy. Want to block all printers from accessing the internet? Not that hard either.


- Furthermore there’s also one-click integration with AWS and Azure, with customers using SteelConnect to seamlessly built an environment with workloads across AWS, Azure and on-premise.
- Besides all that goodness SteelConnect also has a range of access points and switches that can be integrated to create a fully cloud-managed network.
That was a broader introduction than I initially meant to write, pretty much all of the items above I’ll cover technically in the next instalments of this series.
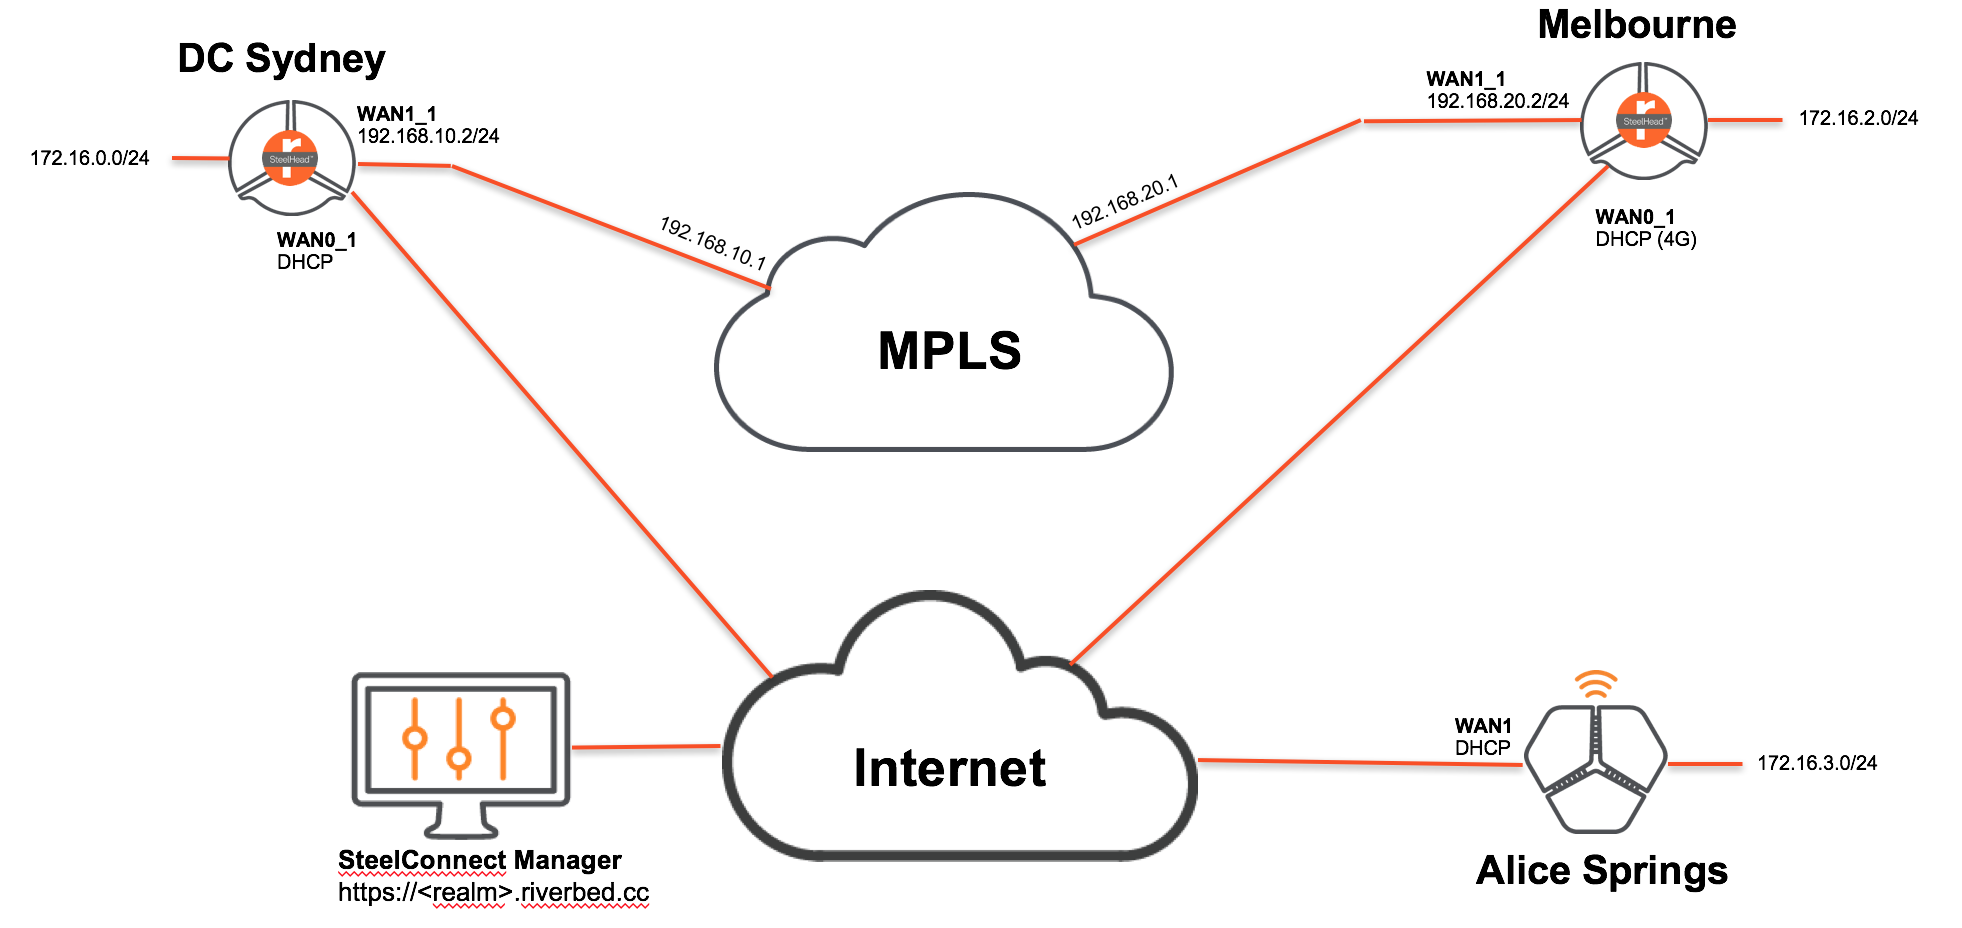
For now let’s get started with how SteelConnect works and what it looks like. The setup for this series has been physically deployed as follows, which is a common topology for a lot of customers:

<th class="column-2">
  Device
</th>

<th class="column-3">
  Internet IP
</th>

<th class="column-4">
  MPLS IP
</th>

<th class="column-5">
  MPLS Gateway IP
</th>

<th class="column-6">
  LAN subnet
</th>
<td class="column-2">
  SteelHead 570-SD
</td>

<td class="column-3">
  DHCP
</td>

<td class="column-4">
  192.168.10.2/24
</td>

<td class="column-5">
  192.168.10.1
</td>

<td class="column-6">
  172.16.0.0/24
</td>
<td class="column-2">
  SteelHead 570-SD
</td>

<td class="column-3">
  DHCP
</td>

<td class="column-4">
  192.168.20.2/24
</td>

<td class="column-5">
  192.168.20.1
</td>

<td class="column-6">
  172.16.2.0/24
</td>
<td class="column-2">
  SteelConnect SDI-130W
</td>

<td class="column-3">
  DHCP
</td>

<td class="column-4">
  -
</td>

<td class="column-5">
  -
</td>

<td class="column-6">
  172.16.3.0/24
</td>
There is one DC site and two branch sites. All SteelConnect appliances will be managed through SteelConnect Manager, which lives in the cloud and gets provisioned automatically.
The ‘MPLS’ link is a WAN simulator in L3 mode, which allows tweaking of the WAN link parameters which will be used in one of the next posts.
Site A and the DC are using SteelHead 570-SD appliances, which is a converged appliance that is an SD-WAN gateway with the capability to do WAN optimisation. This blog post only covers the SD-WAN piece, the WAN optimisation will be covered in part 8 of the series.
Site B has a SDI-130W, which is a SteelConnect-only gateway with 8 Gigabit ports and wireless capabilities, targeted for smaller remote branches. It’s only connected to the internet in this case.
The purpose of this post is to run through the basic configuration of SteelConnect Manager, as one would do installing the devices for the very first time. We’ll get the sites up with the overlay/underlay up and running. Subsequent blog posts will cover the advanced features in more detail.
If you want to test SteelConnect in your own environment or just see how it works, you can setup your own environment and start testing within minutes here. You can use virtual gateways instead of the physical devices I use in this blog post, the setup is almost identical.
As explained above, everything is managed through SteelConnect Manager. SCM consists of a hierarchy, with realms and organisations. Most enterprises would have a realm, with one or more organisations under that each managed separately. This is particularly useful for multinationals for example, for different business units within one company or managed service providers.
So let’s get started! Go to the URL of your SteelConnect Manager, and login with the credentials provided.

When you log into an organisation in SCM for the first time, you’ll see the dashboard below. Click on the image to zoom in.
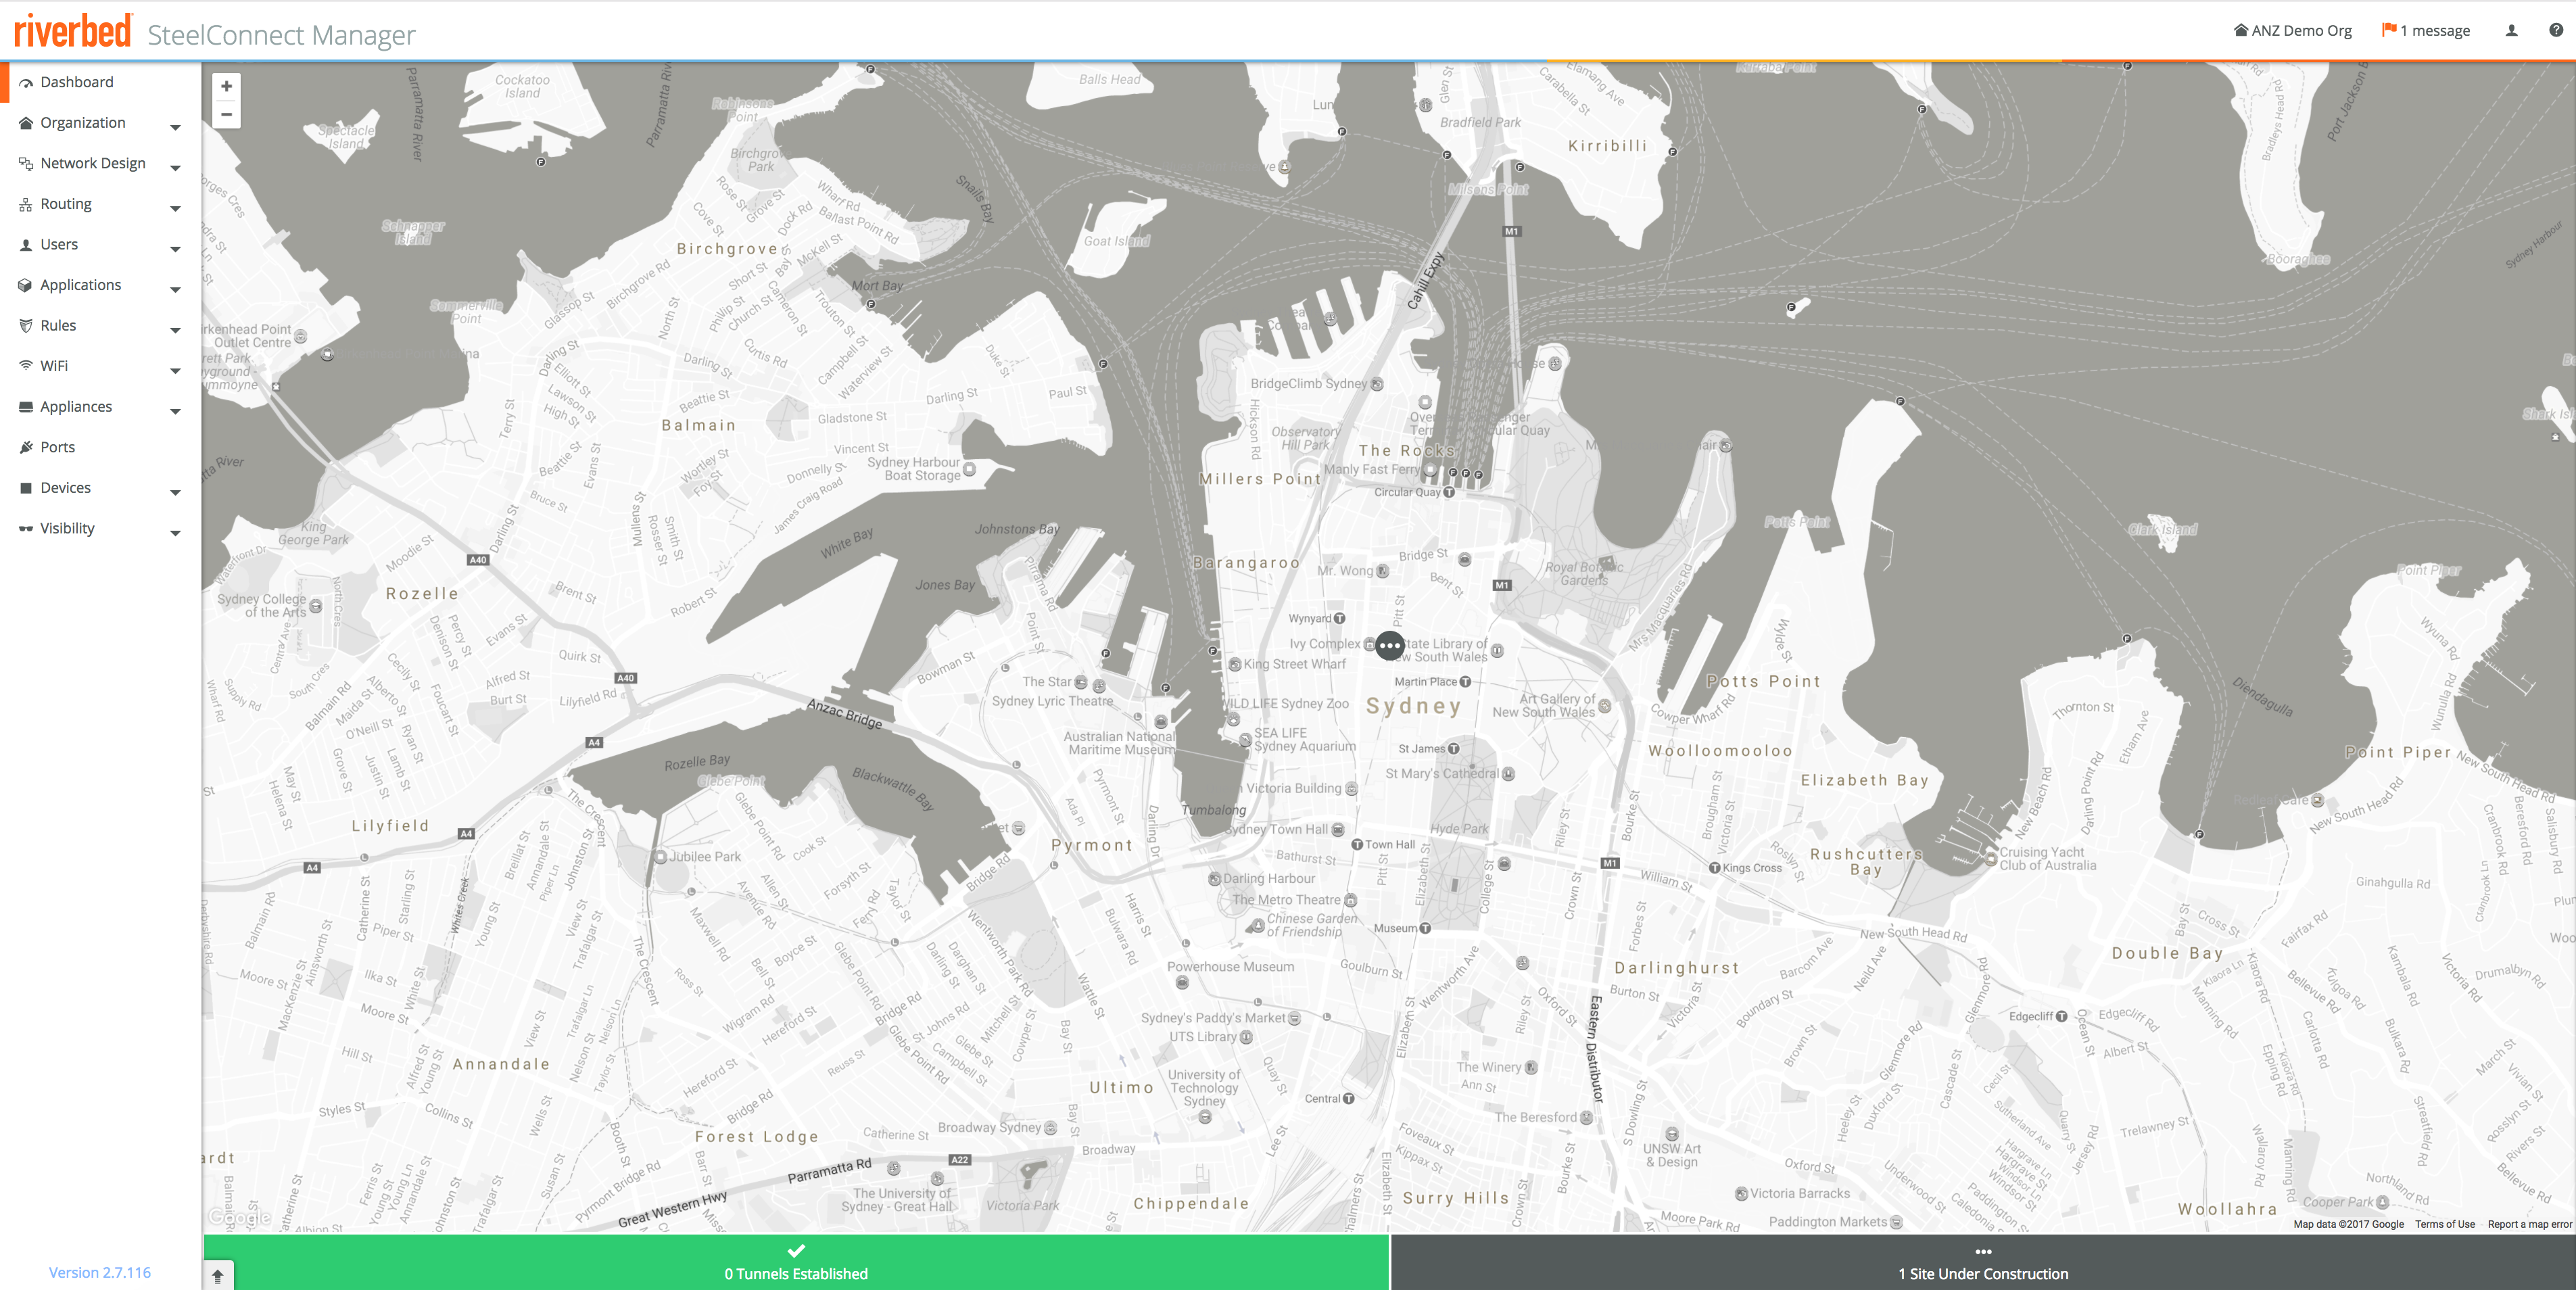

The first time there will be a site called HQ, using the address that was submitted during creation of the organisation.
On the left you see the menu, from where everything will be configured. It’s outside the scope of this blog post, but if you have access to SCM I recommend to explore the GUI and particularly the Organisation tab, where global settings for internet breakout, numbering pools (VLANs, default subnet IPs), social media integration and maintenance can be defined.
To get started with our 3-site setup, there are a few things we must do:
- Create the sites.
- Add the MPLS WAN.
- Configure the MPLS uplinks.
- Pre-provision the appliances and configure them.
- Add the physical hardware.
- Watch the magic!
Step 1 - Create the sites
It’s not mandatory to do the steps in this order, but it makes the most sense. Let’s start by adding the different locations. Click on Network Design on the left, then Sites.
Click on Add Site(s) on the top right, and create the sites like in the example below. If you have a lot of sites you can also do a bulk import, for now we’ll stick with adding them manually.


This puts them on the dashboard, which looks like this after adding the sites above.
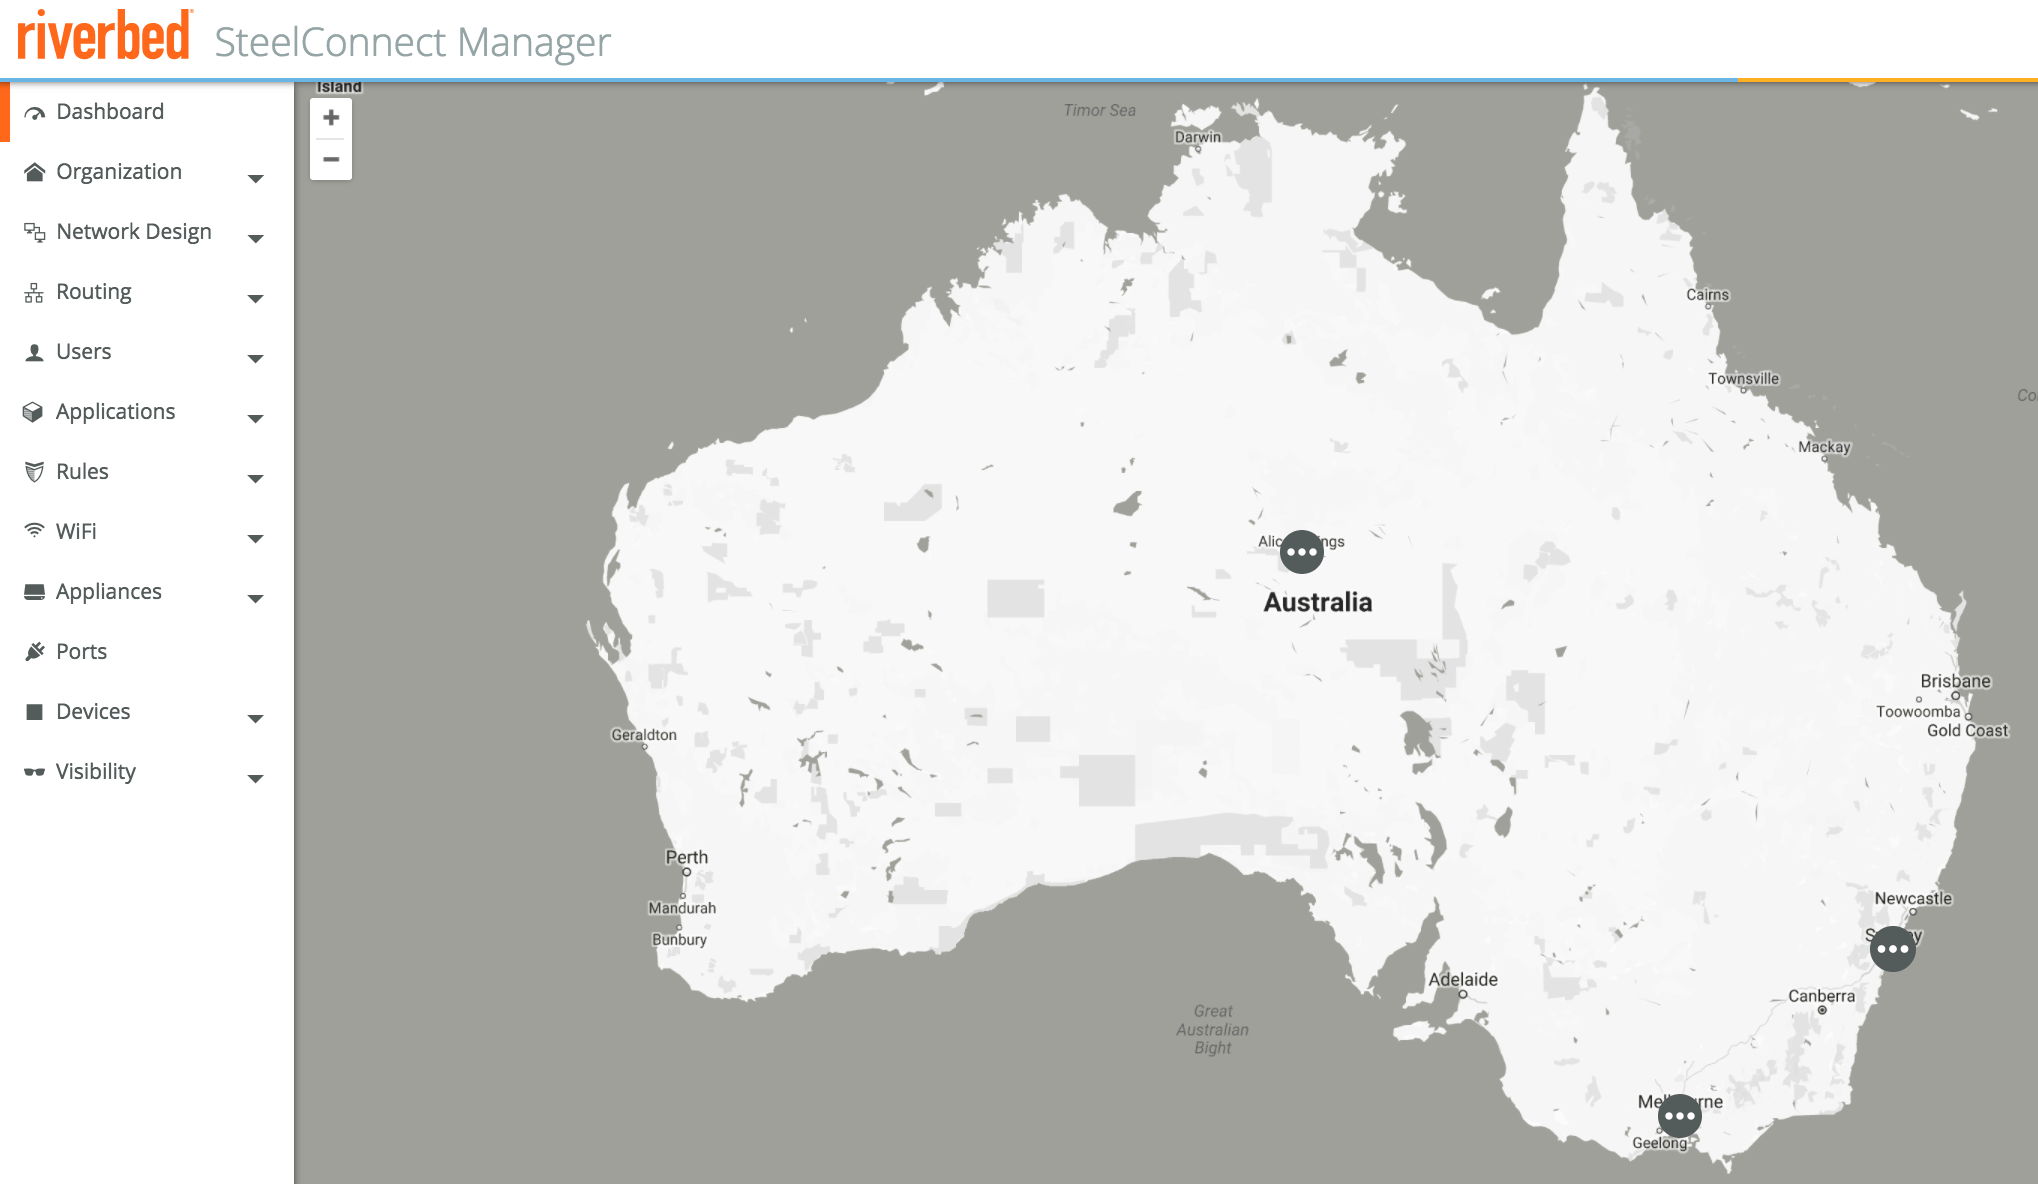

What has happened so far is that the sites have been created, and when you look in Network Design -> Zones now, a few default default zones have created using the VLAN numbers and subnets from the organisation default. If you want to change these zones or add more zones to a site, this is where you’d do that. Let’s leave it at the default for now.


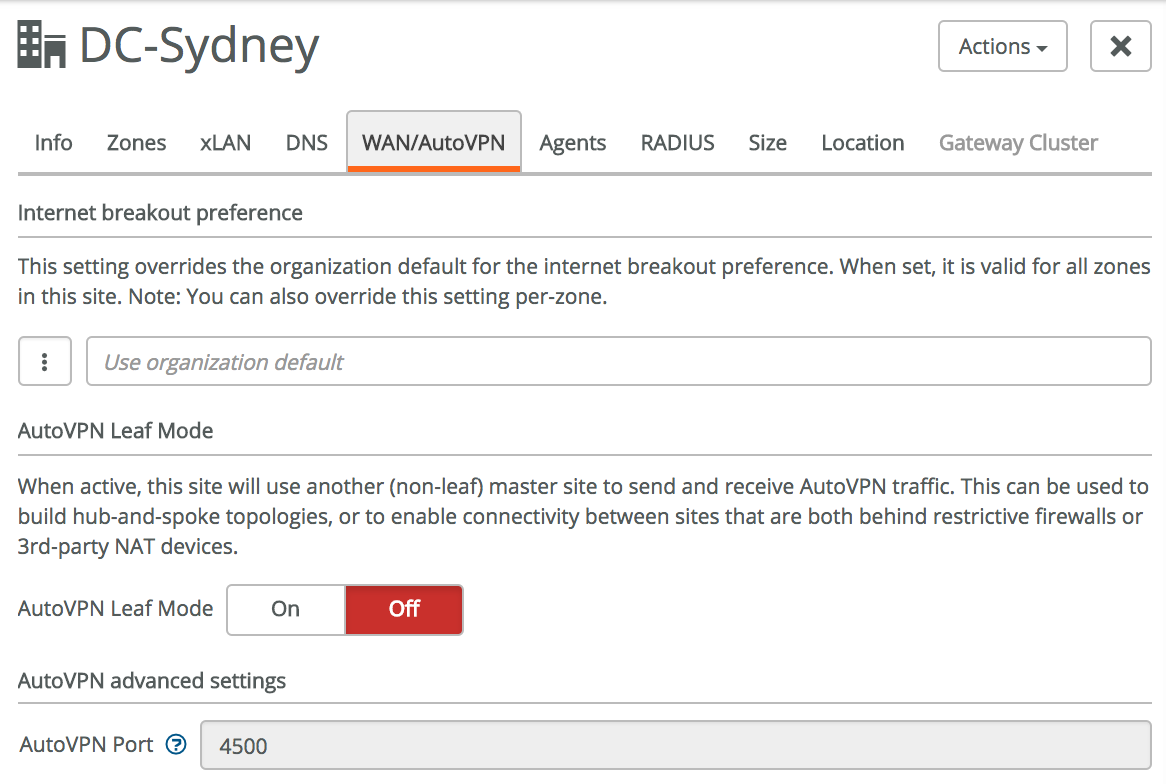
By default all sites will create a full mesh secure VPN overlay, using IPSec and UDP 4500. This is fine for our configuration, however if you want to change this to leaf mode with one central spoke, or want to use other ports due to firewall restrictions, you can change that in Network Design -> Sites -> click on a site -> WAN/AutoVPN. We won’t touch this in our configuration.

Step 2 - Add the MPLS WAN
Next we’ll add the MPLS WAN. By default all sites will be configured with an internet uplink, and a RouteVPN uplink which automatically creates IPSec tunnels over Internet links to create a secure overlay network.
Adding an extra WAN is easy, click on New WAN in the top right and configure the right settings. Most important is probably **Internet Breakout. **If you want to use the MPLS for internet breakout you can specify that here, using either another SteelConnect site as the internet breakout or using a 3rd party router.
In the configuration below the DC-Sydney site is configured as the internet breakout site for the MPLS WAN.
When creating the WAN we need to specify which zones or sites are leveraging this WAN. In our setup only DC-Sydney and Site-Melbourne have an MPLS connection, so they are specified in the Member zones/networks section.
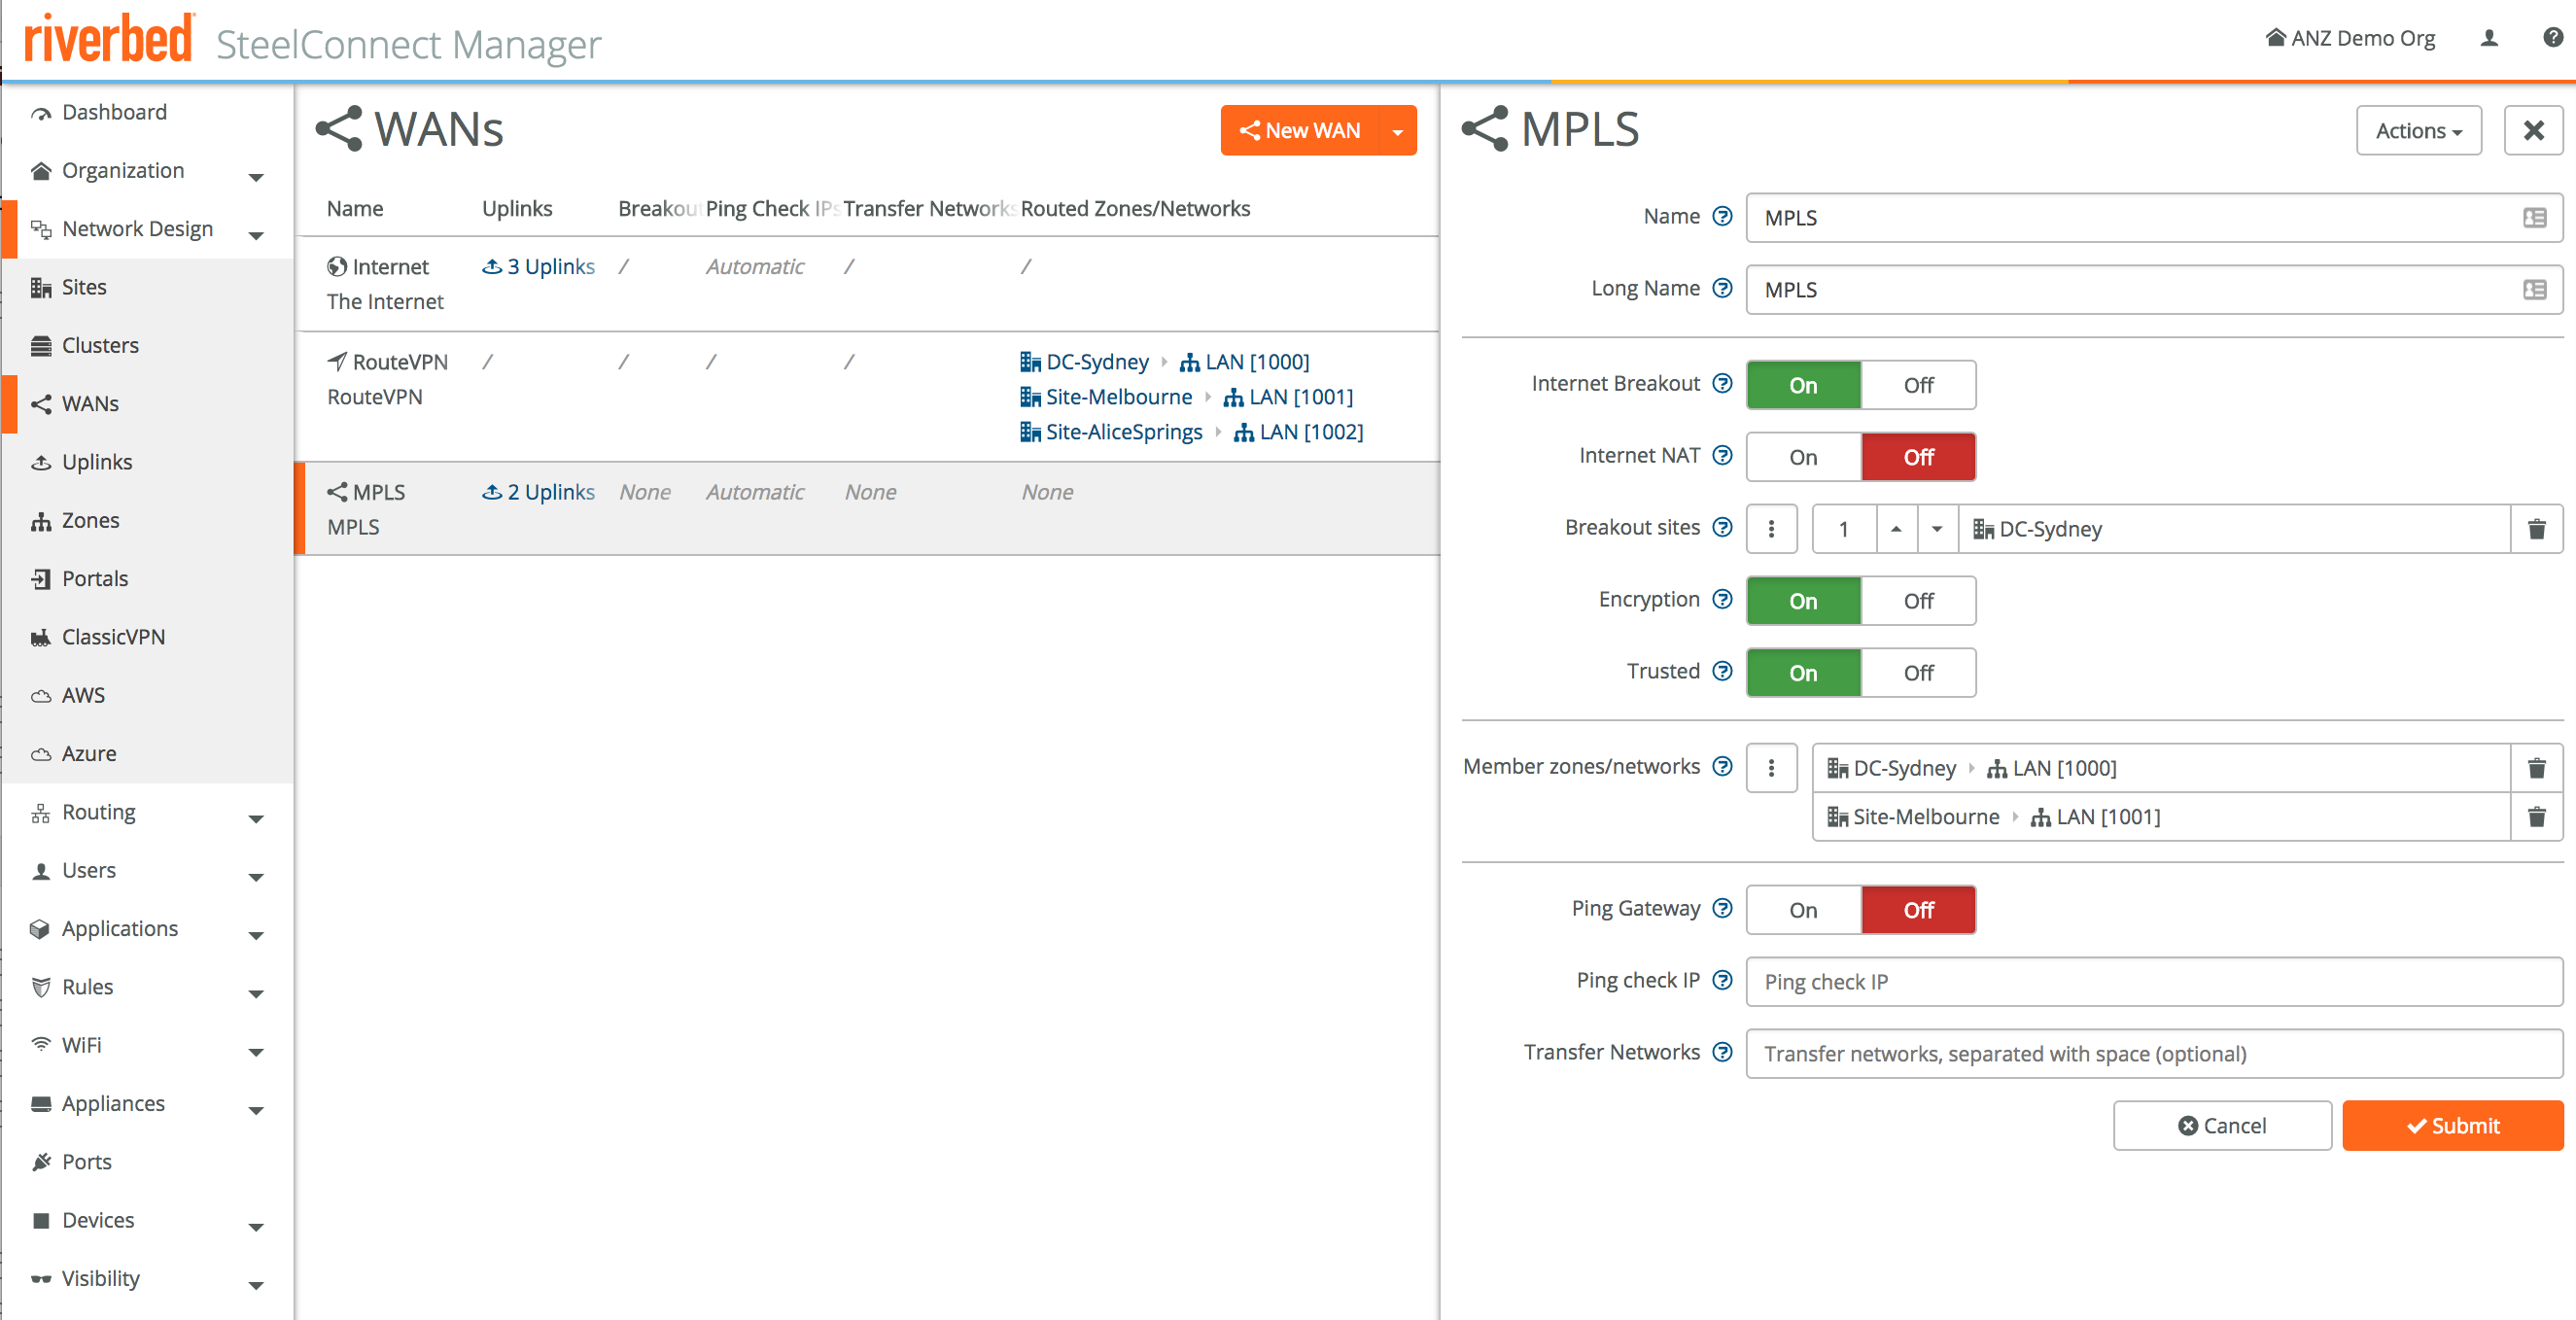

Once created, our WANs look like this. Each site has internet breakout, and DC-Sydney and Site-Melbourne also have an MPLS WAN attached. Keep in mind that we still haven’t attached any physical devices, the whole zero-touch provisioning process is design first, deploy second.


Step 3 - Configure the MPLS uplinks
Next up we’ll configure the IP addresses for our MPLS network. We created the MPLS WAN, now it’s time to setup the actual uplinks used by the devices. By default uplinks for internet and other WANs will use DHCP, in our case we’ll assign static IPs for our MPLS links as per the design.
DC-Sydney: 192.168.10.2/24 (GW = 192.168.10.1)
Site-Melbourne: 192.168.20.2/24 (GW = 192.168.20.1)
(I know: I should’ve used a /30…)
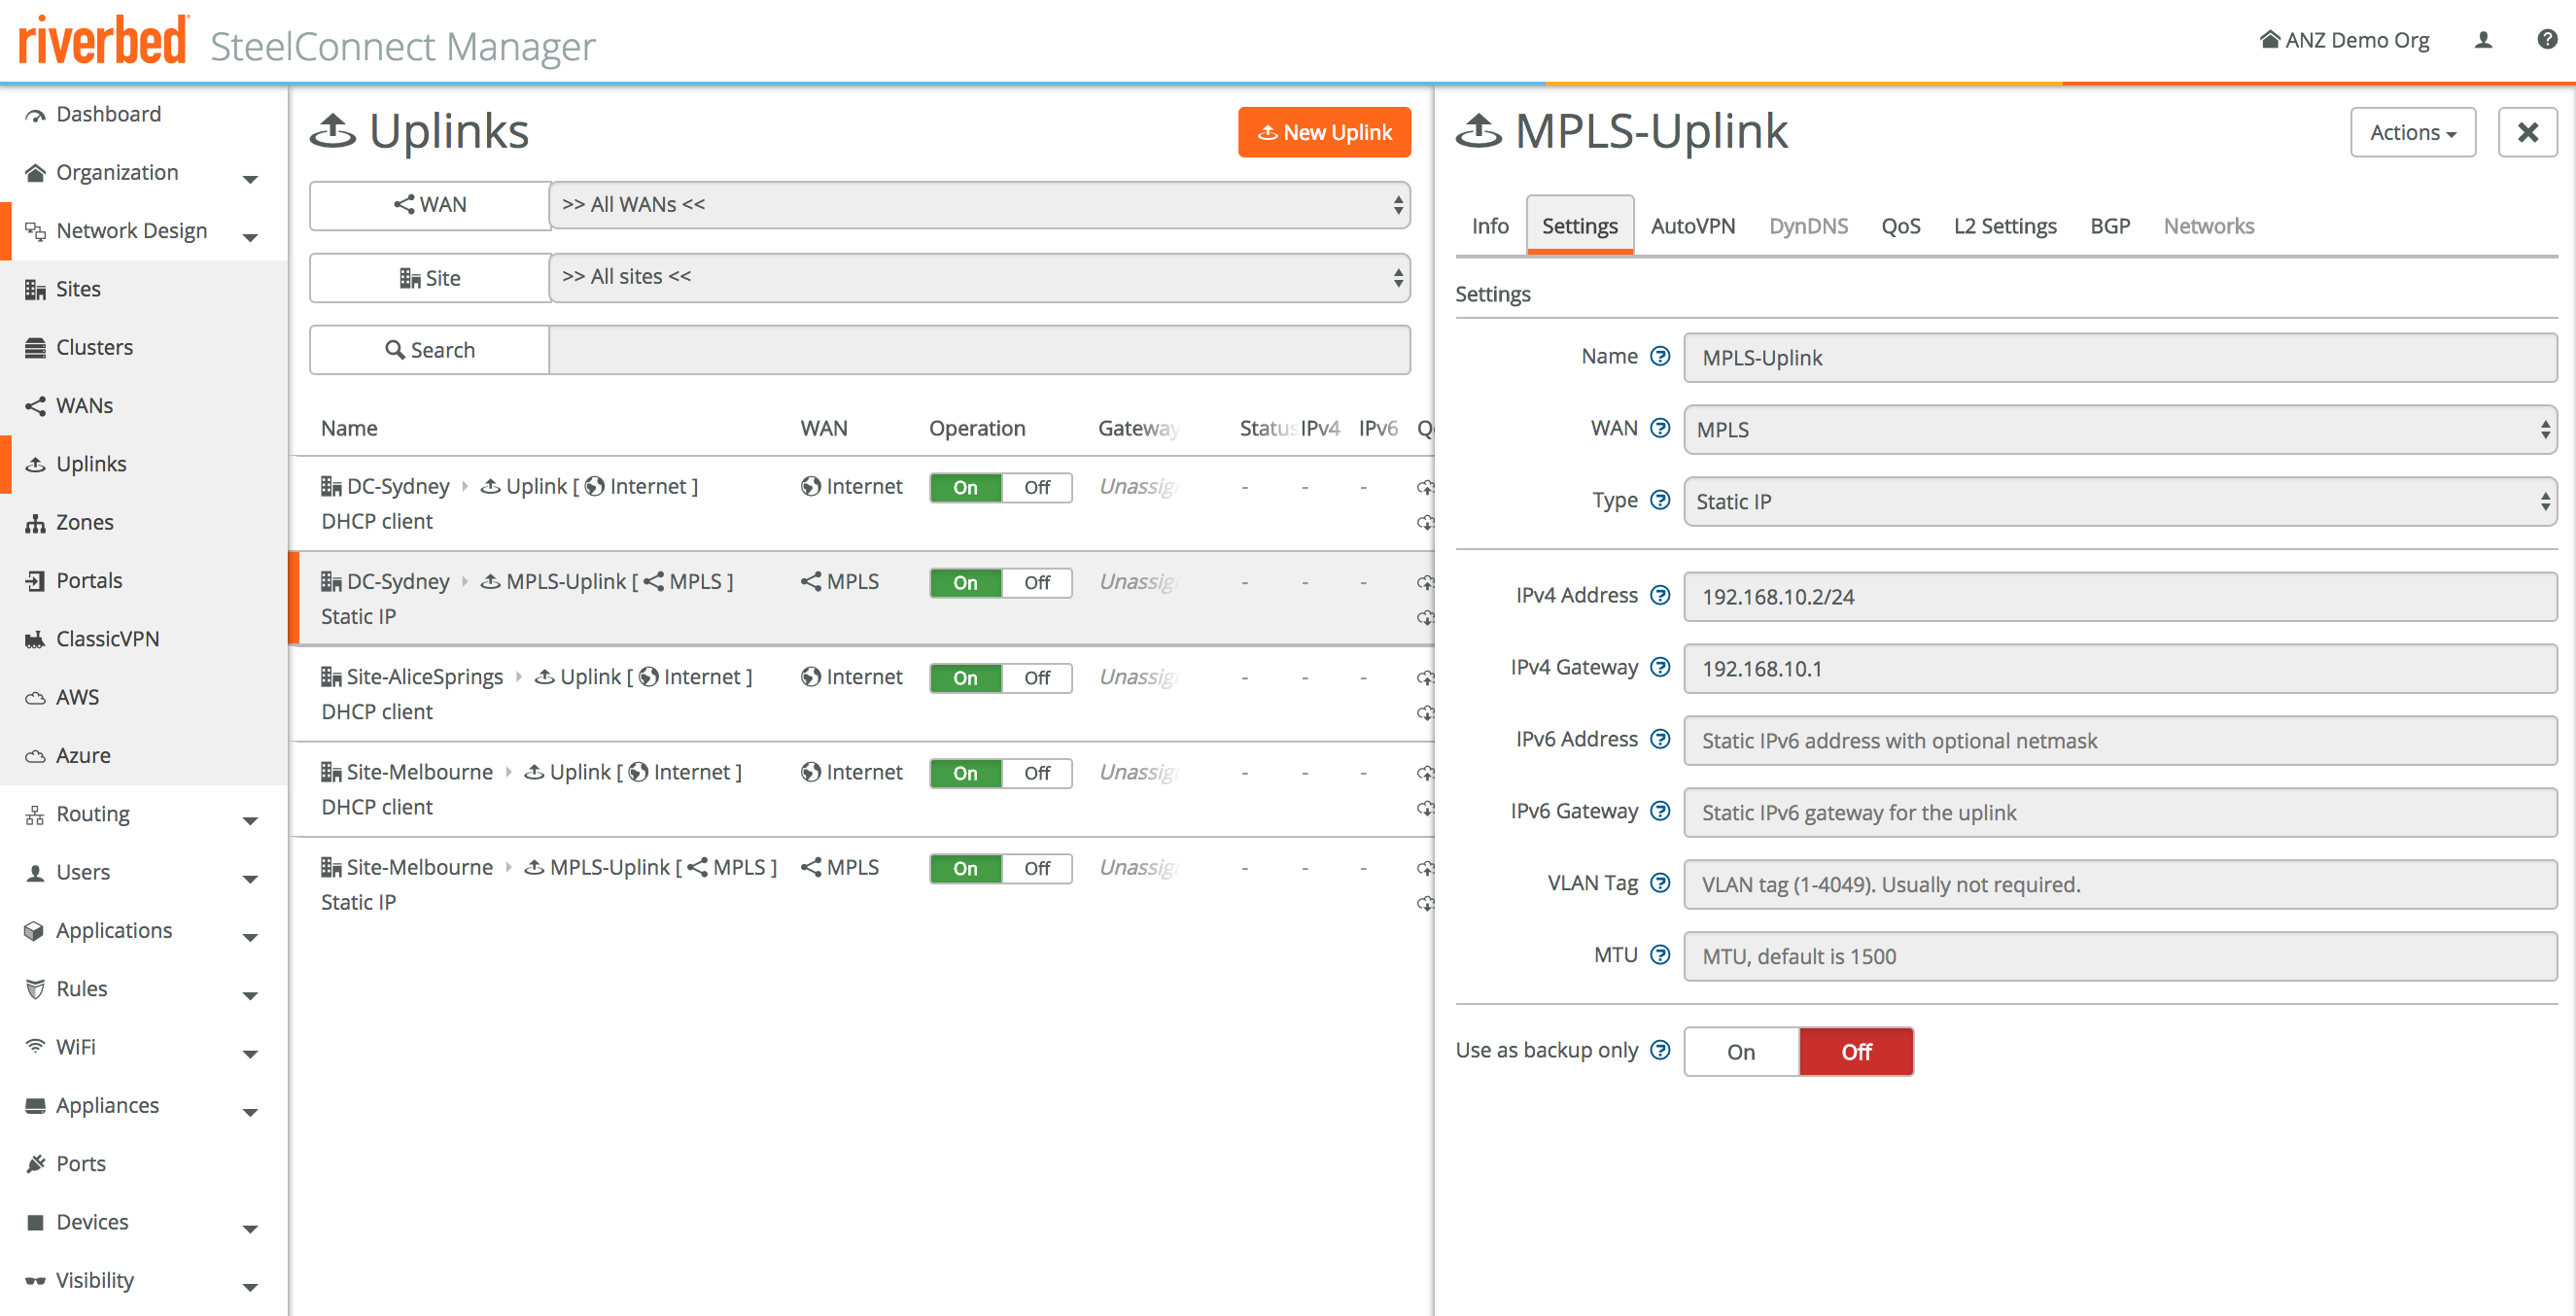

Alright, basic connectivity is almost done! We’ve created the sites, we’ve added the MPLS WAN, and we’ve configured the details for the MPLS network.
Step 4 - Pre-provision the appliances and configure them
Now we’ll add the actual appliances. This is unsurprisingly done under Appliances -> Overview. Click on Add appliances, then on Create Shadow Appliance.
A shadow appliance can be seen as a cardboard cutout of a real appliance, a placeholder until you have the real device. This allows for full configuration of then network, even before the physical devices are in place. If you’ve ordered equipment, you can already configure it before it’s in your hands. All you have to do to finish the configuration is add the serial number of the physical device once you have the device, so SCM knows that particular device belongs to your realm.
The shadow appliance step is optional, if you already have the physical device and are ready to configure it you can register the hardware straight away with Register Hardware Appliance.
I’ll create shadow appliances first, to show what that looks like.
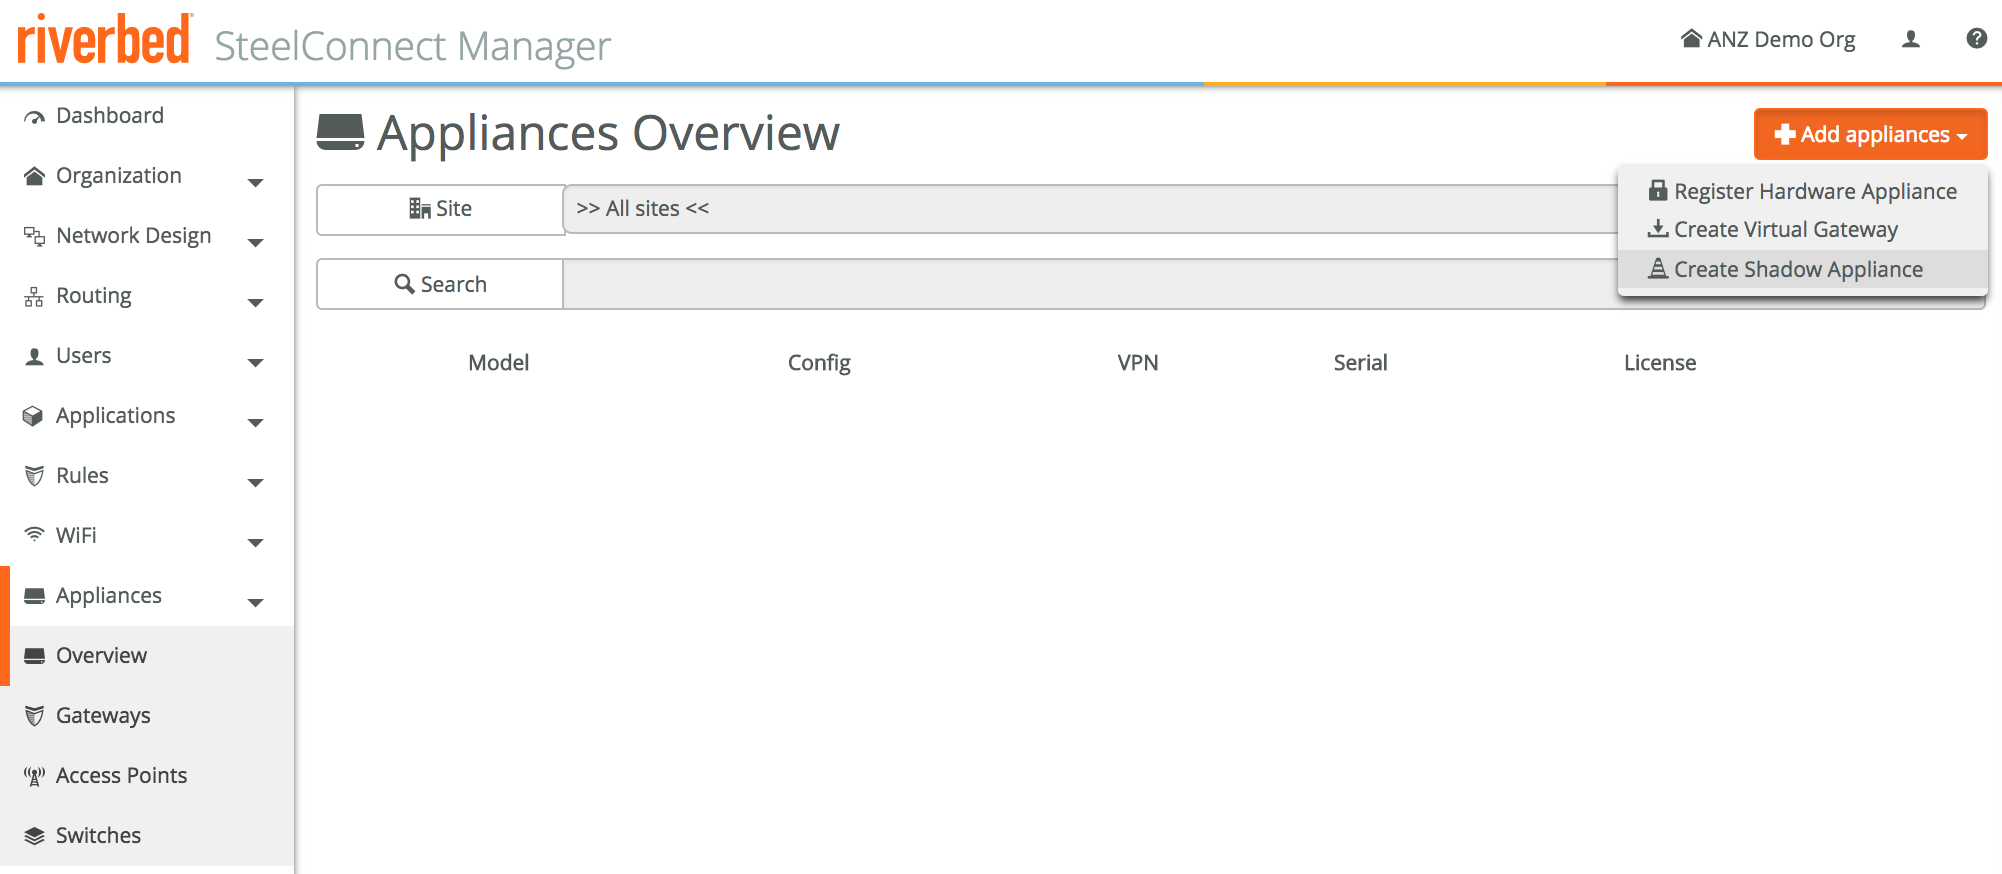

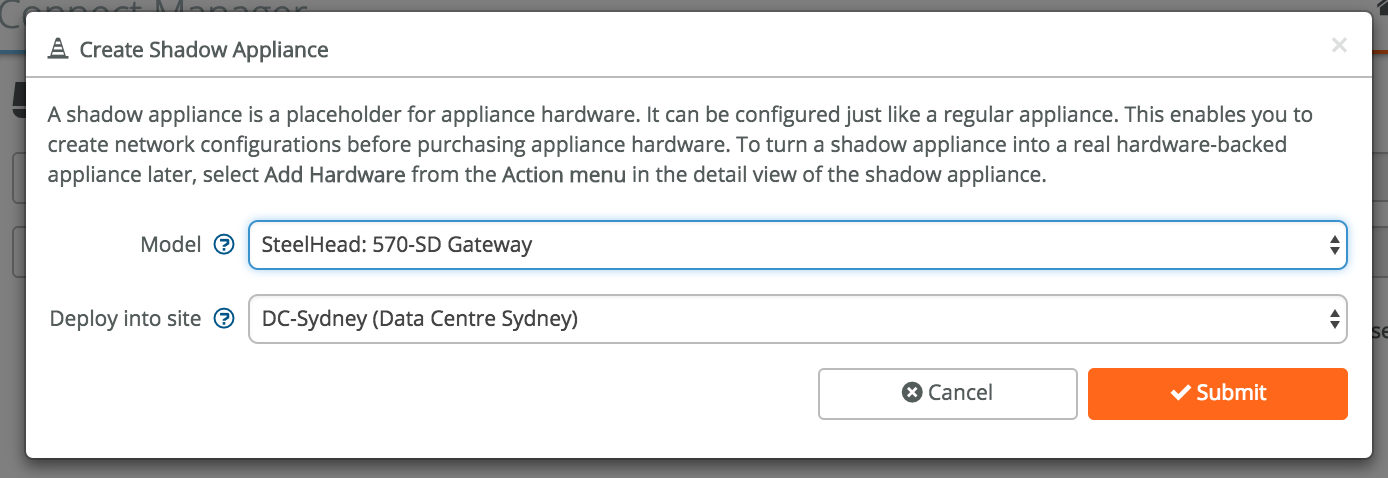

After creating the shadow appliances for all three sites, this is what it looks like.
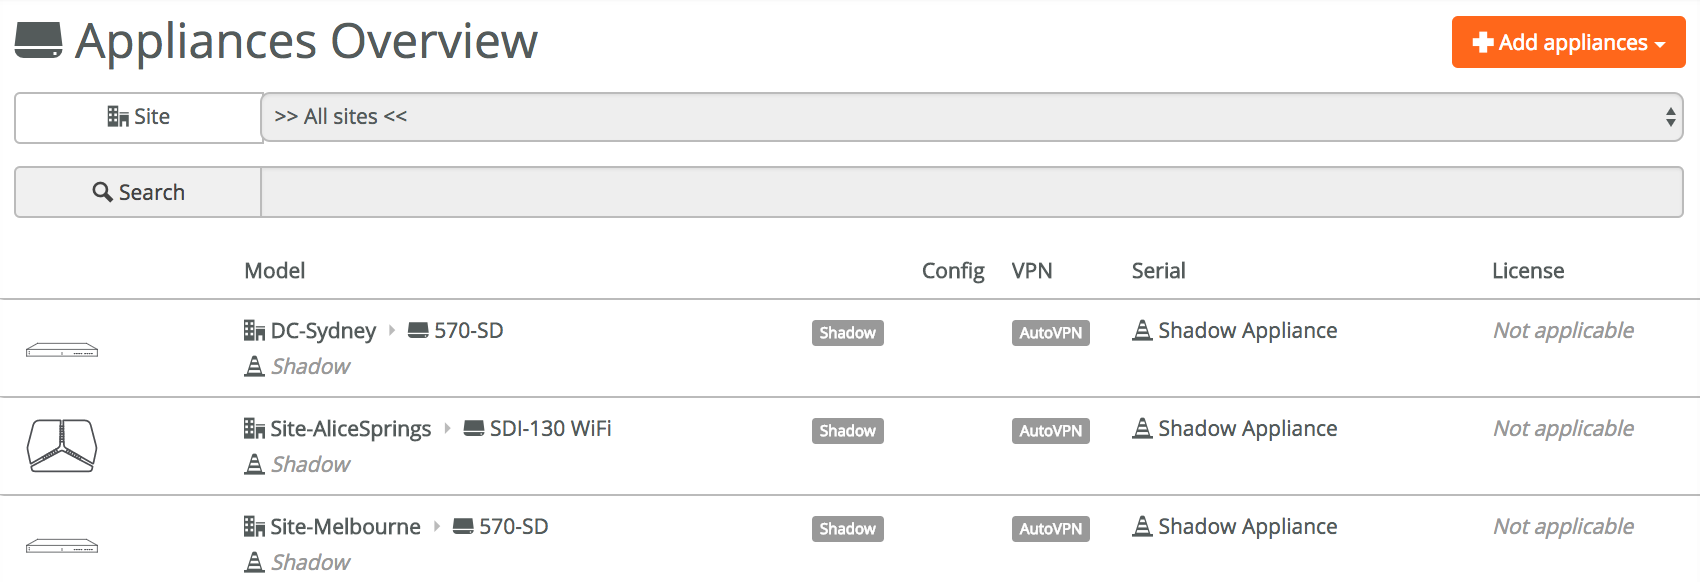

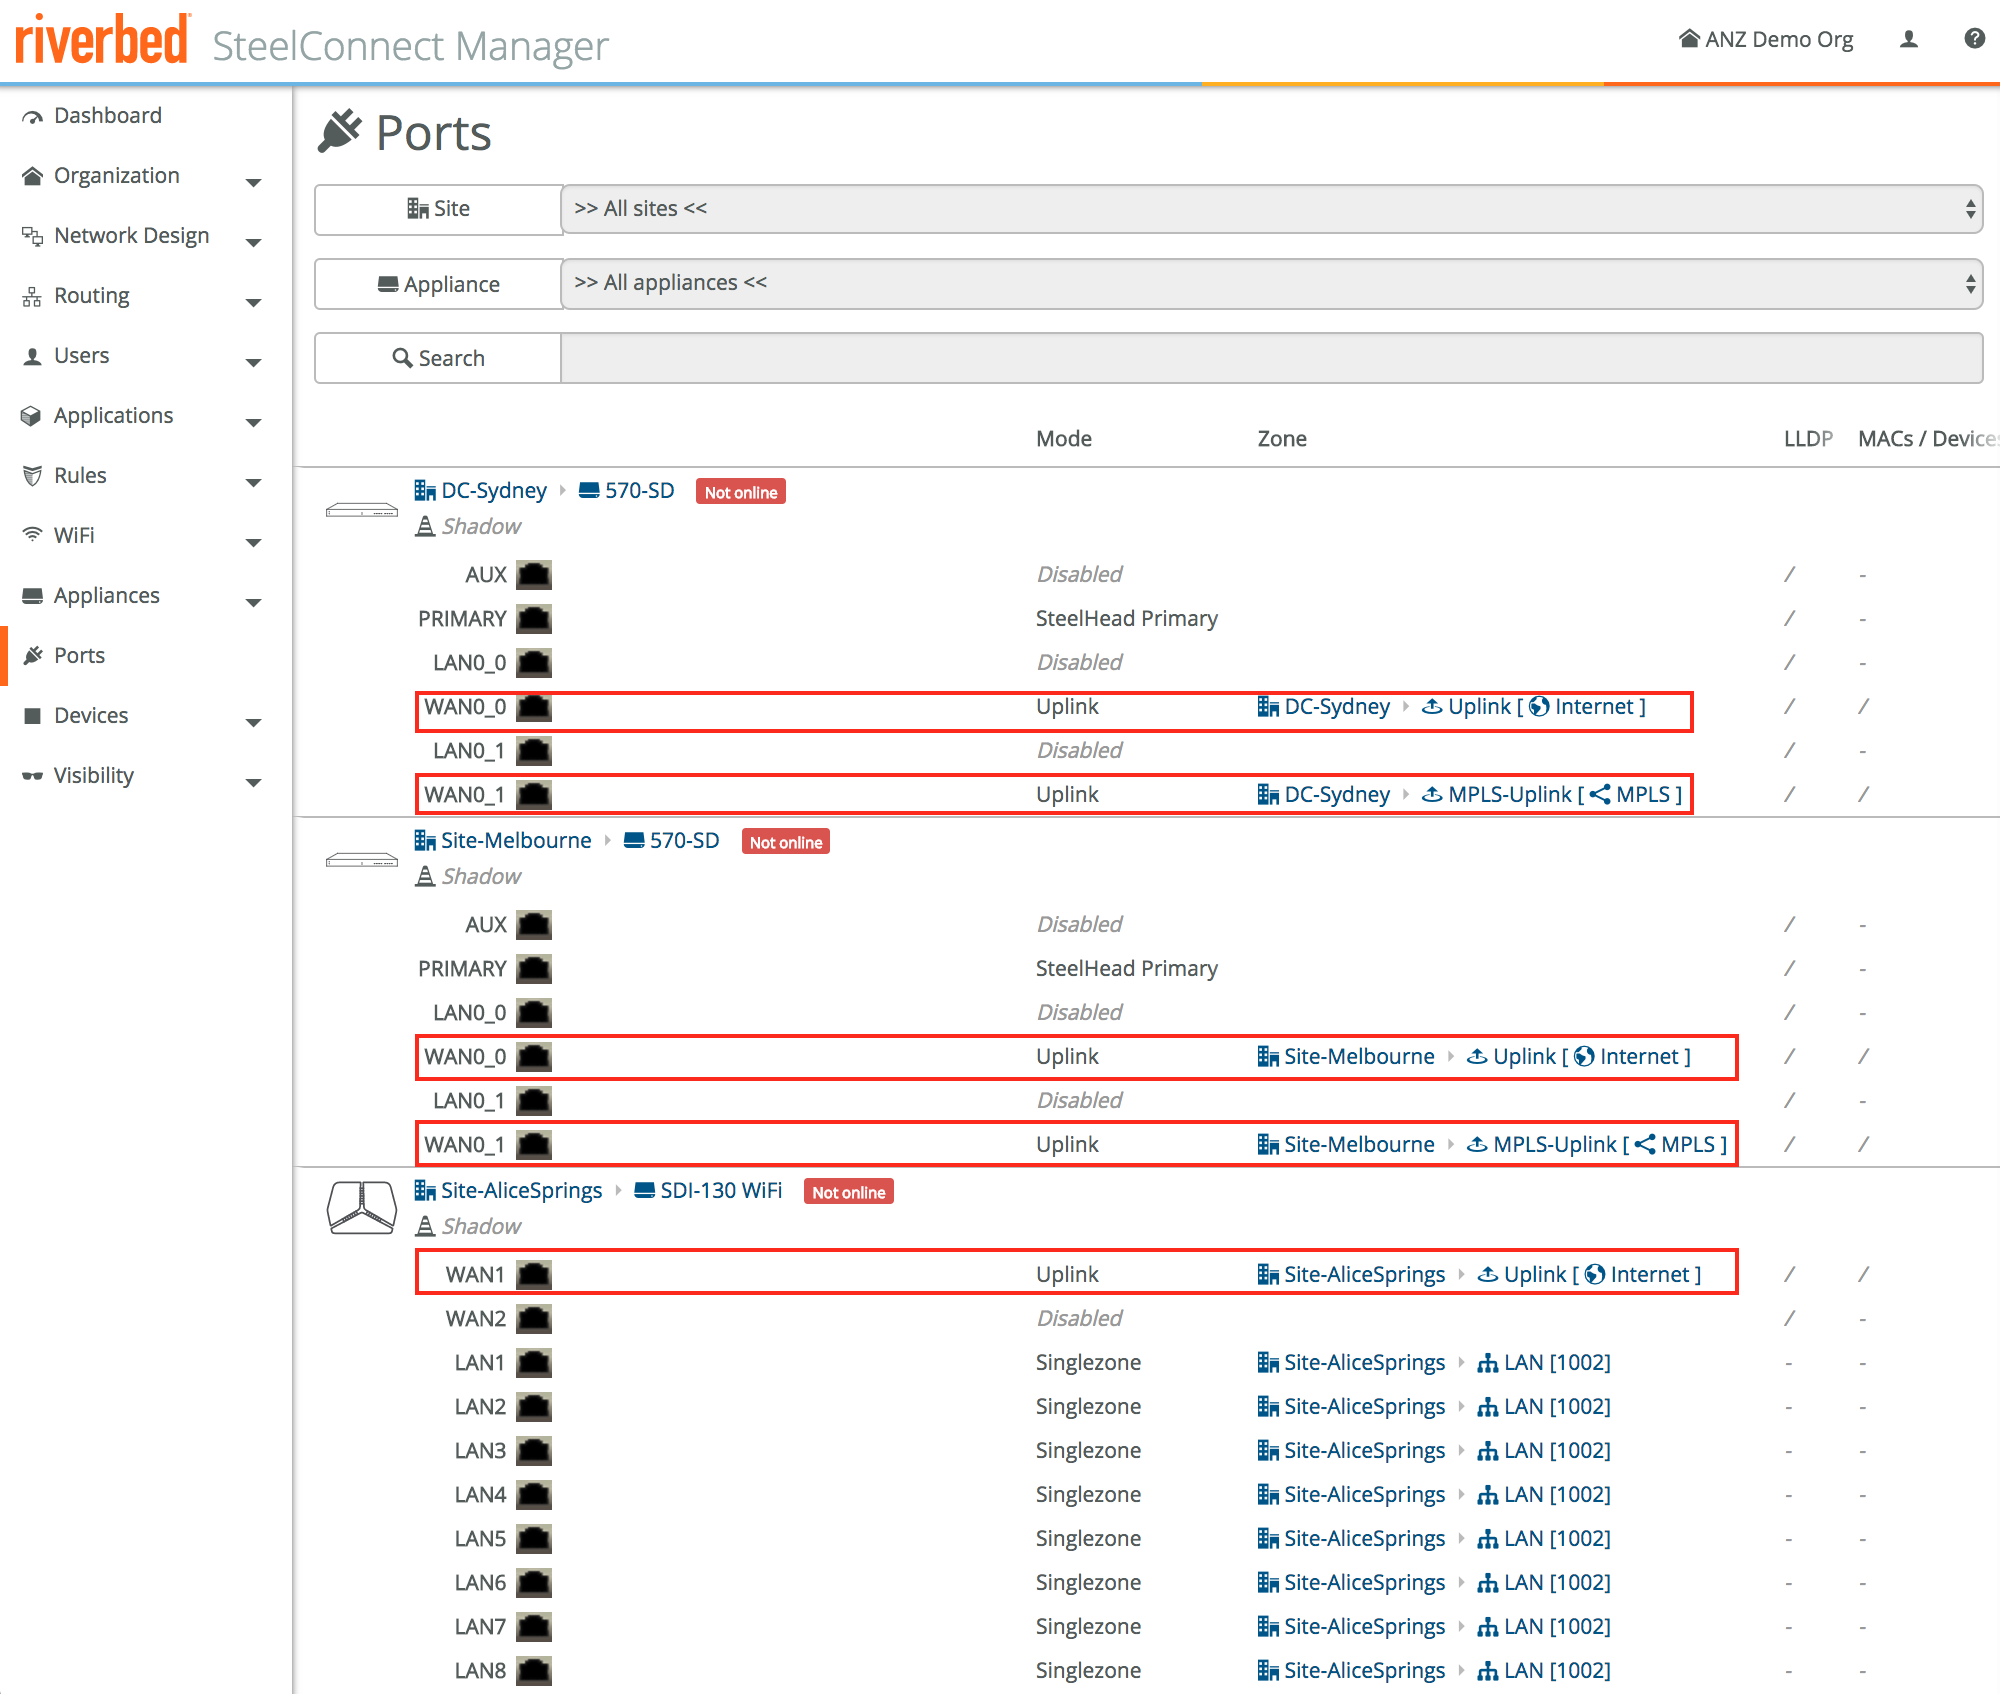
With the shadow appliances created, let’s look at the port configuration. We have internet and MPLS connectivity configured for DC-Sydney and Site-Melbourne, and internet for Site-AliceSprings.
The physical port setup is found under, you never guessed it, Ports. The uplink/WAN ports have automatically been configured with the first WAN port for internet and the second uplink WAN port for MPLS for those sites that have MPLS configured. This is exactly what we want, so no need to change anything here.

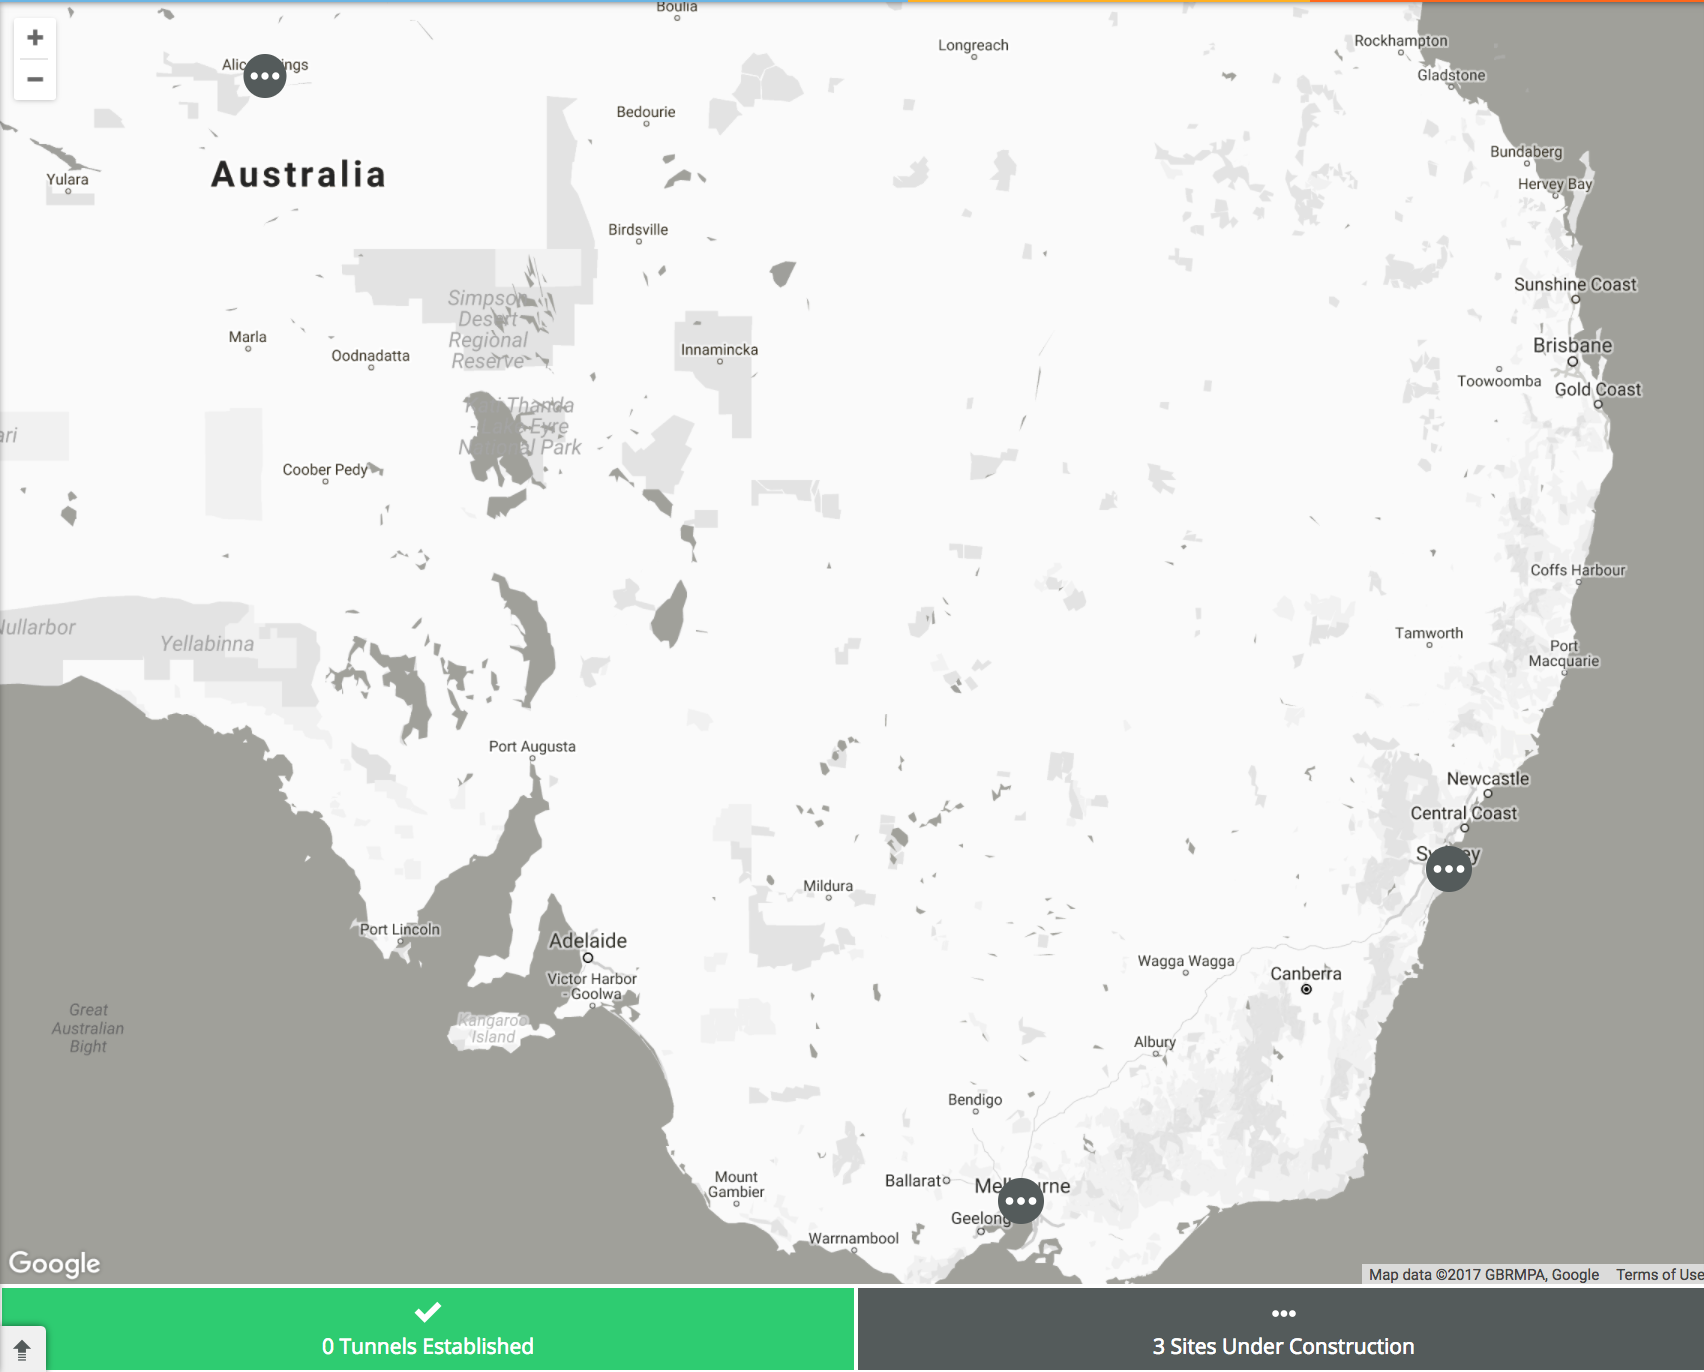
We’re getting close! Before we attach the physical hardware to the shadow appliances, let’s have a last look at the dashboard. No changes there, all sites are still under construction until we add the physical devices next.

Step 5 - Add the physical hardware
As mentioned before I could’ve added the hardware straight away without using the shadow appliances, but it’s a good way to pre-provision the network before you have the devices. Once you then get the physical hardware, it’s easy to put in the serial number. It also shows that the actual hardware is not that relevant: all configuration lives in SCM and just gets applied to the appliance. In case an appliance needs to be replaced, you can just remove the old appliance, replace it with a new one and update the serial number. The same configuration will be applied automatically, instead of manually having to provision those like in the old days.
Adding an appliance is easy: go to **Appliances -> **click on the appliance, then Register hardware. Fill in the serial number, click submit and Bob’s your uncle. Do this for all appliances.


An often asked question is: what prohibits me from importing someone else’s device into my portal once I have the serial number? Good question, and the answer is: an unlock code. Once an appliance is deployed into a certain realm, it can’t be taken out of that realm without an unlock code which is only available to the originating realm administrator.
Step 6 - Magic!
The last step is to cable the physical devices, using the first WAN port for internet and the second port for MPLS as per our default configuration.
Once that’s done it’s time power on the devices, after a few minutes you’ll automatically see messages in the event log confirming the device has come online. The device will then download the latest firmware if not present yet, and reboot. Once updated they’ll automatically start building secure VPN overlay tunnels.
That’s all, all sites will now have connectivity to each other over a secure VPN overlay with direct internet breakout.


The dashboard will show all appliances as green, which means they’re up. Click on any of the sites and you’ll see the links to other sites. In the screenshot below the Alice Springs device hasn’t been powered on yet, the other two sites are up and running, and have built a VPN between each other. The device I planned to use for the Alice Springs site is currently used for another PoC so I can’t show a full mesh just yet.
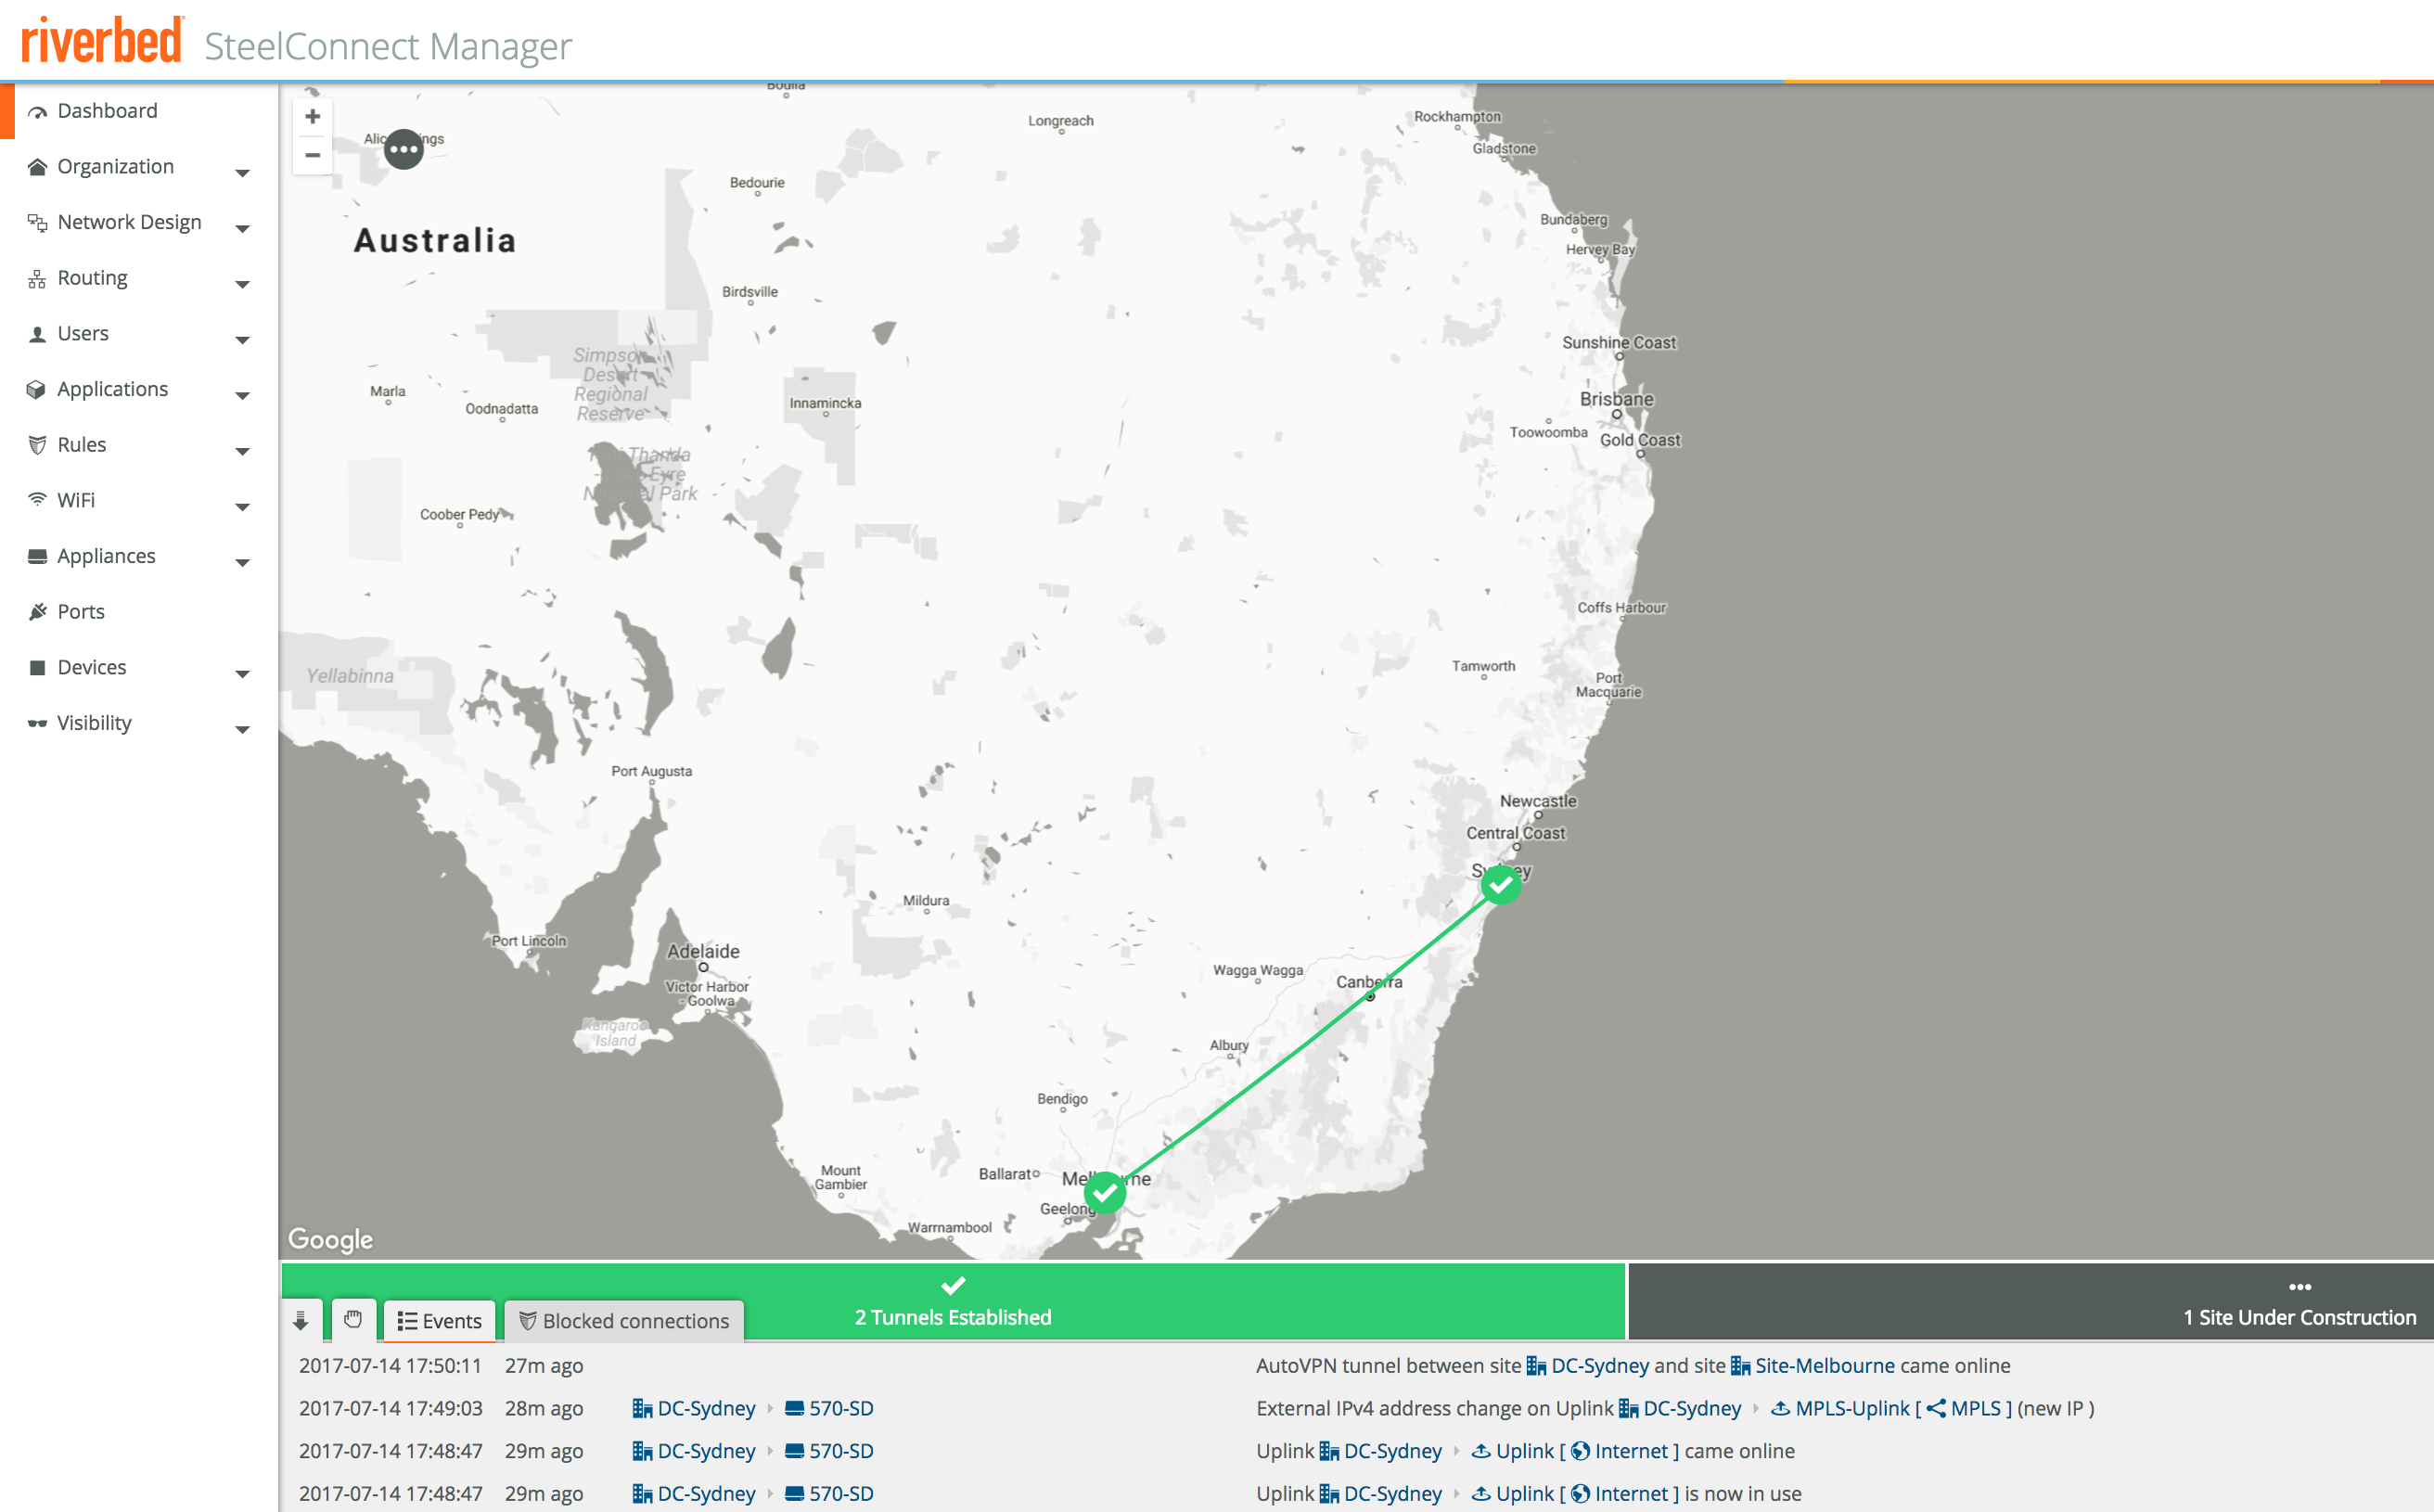

Click on the link to get details for each particular link and WAN. The inbound/outbound throughput is shown, as well as path quality metrics like latency, jitter and packet loss.
This is not just handy for monitoring, SCM can also use these metrics for intelligent traffic steering if desired. If the latency suddenly increases, new connections will use the other path available. More on that in part 4 of the series.
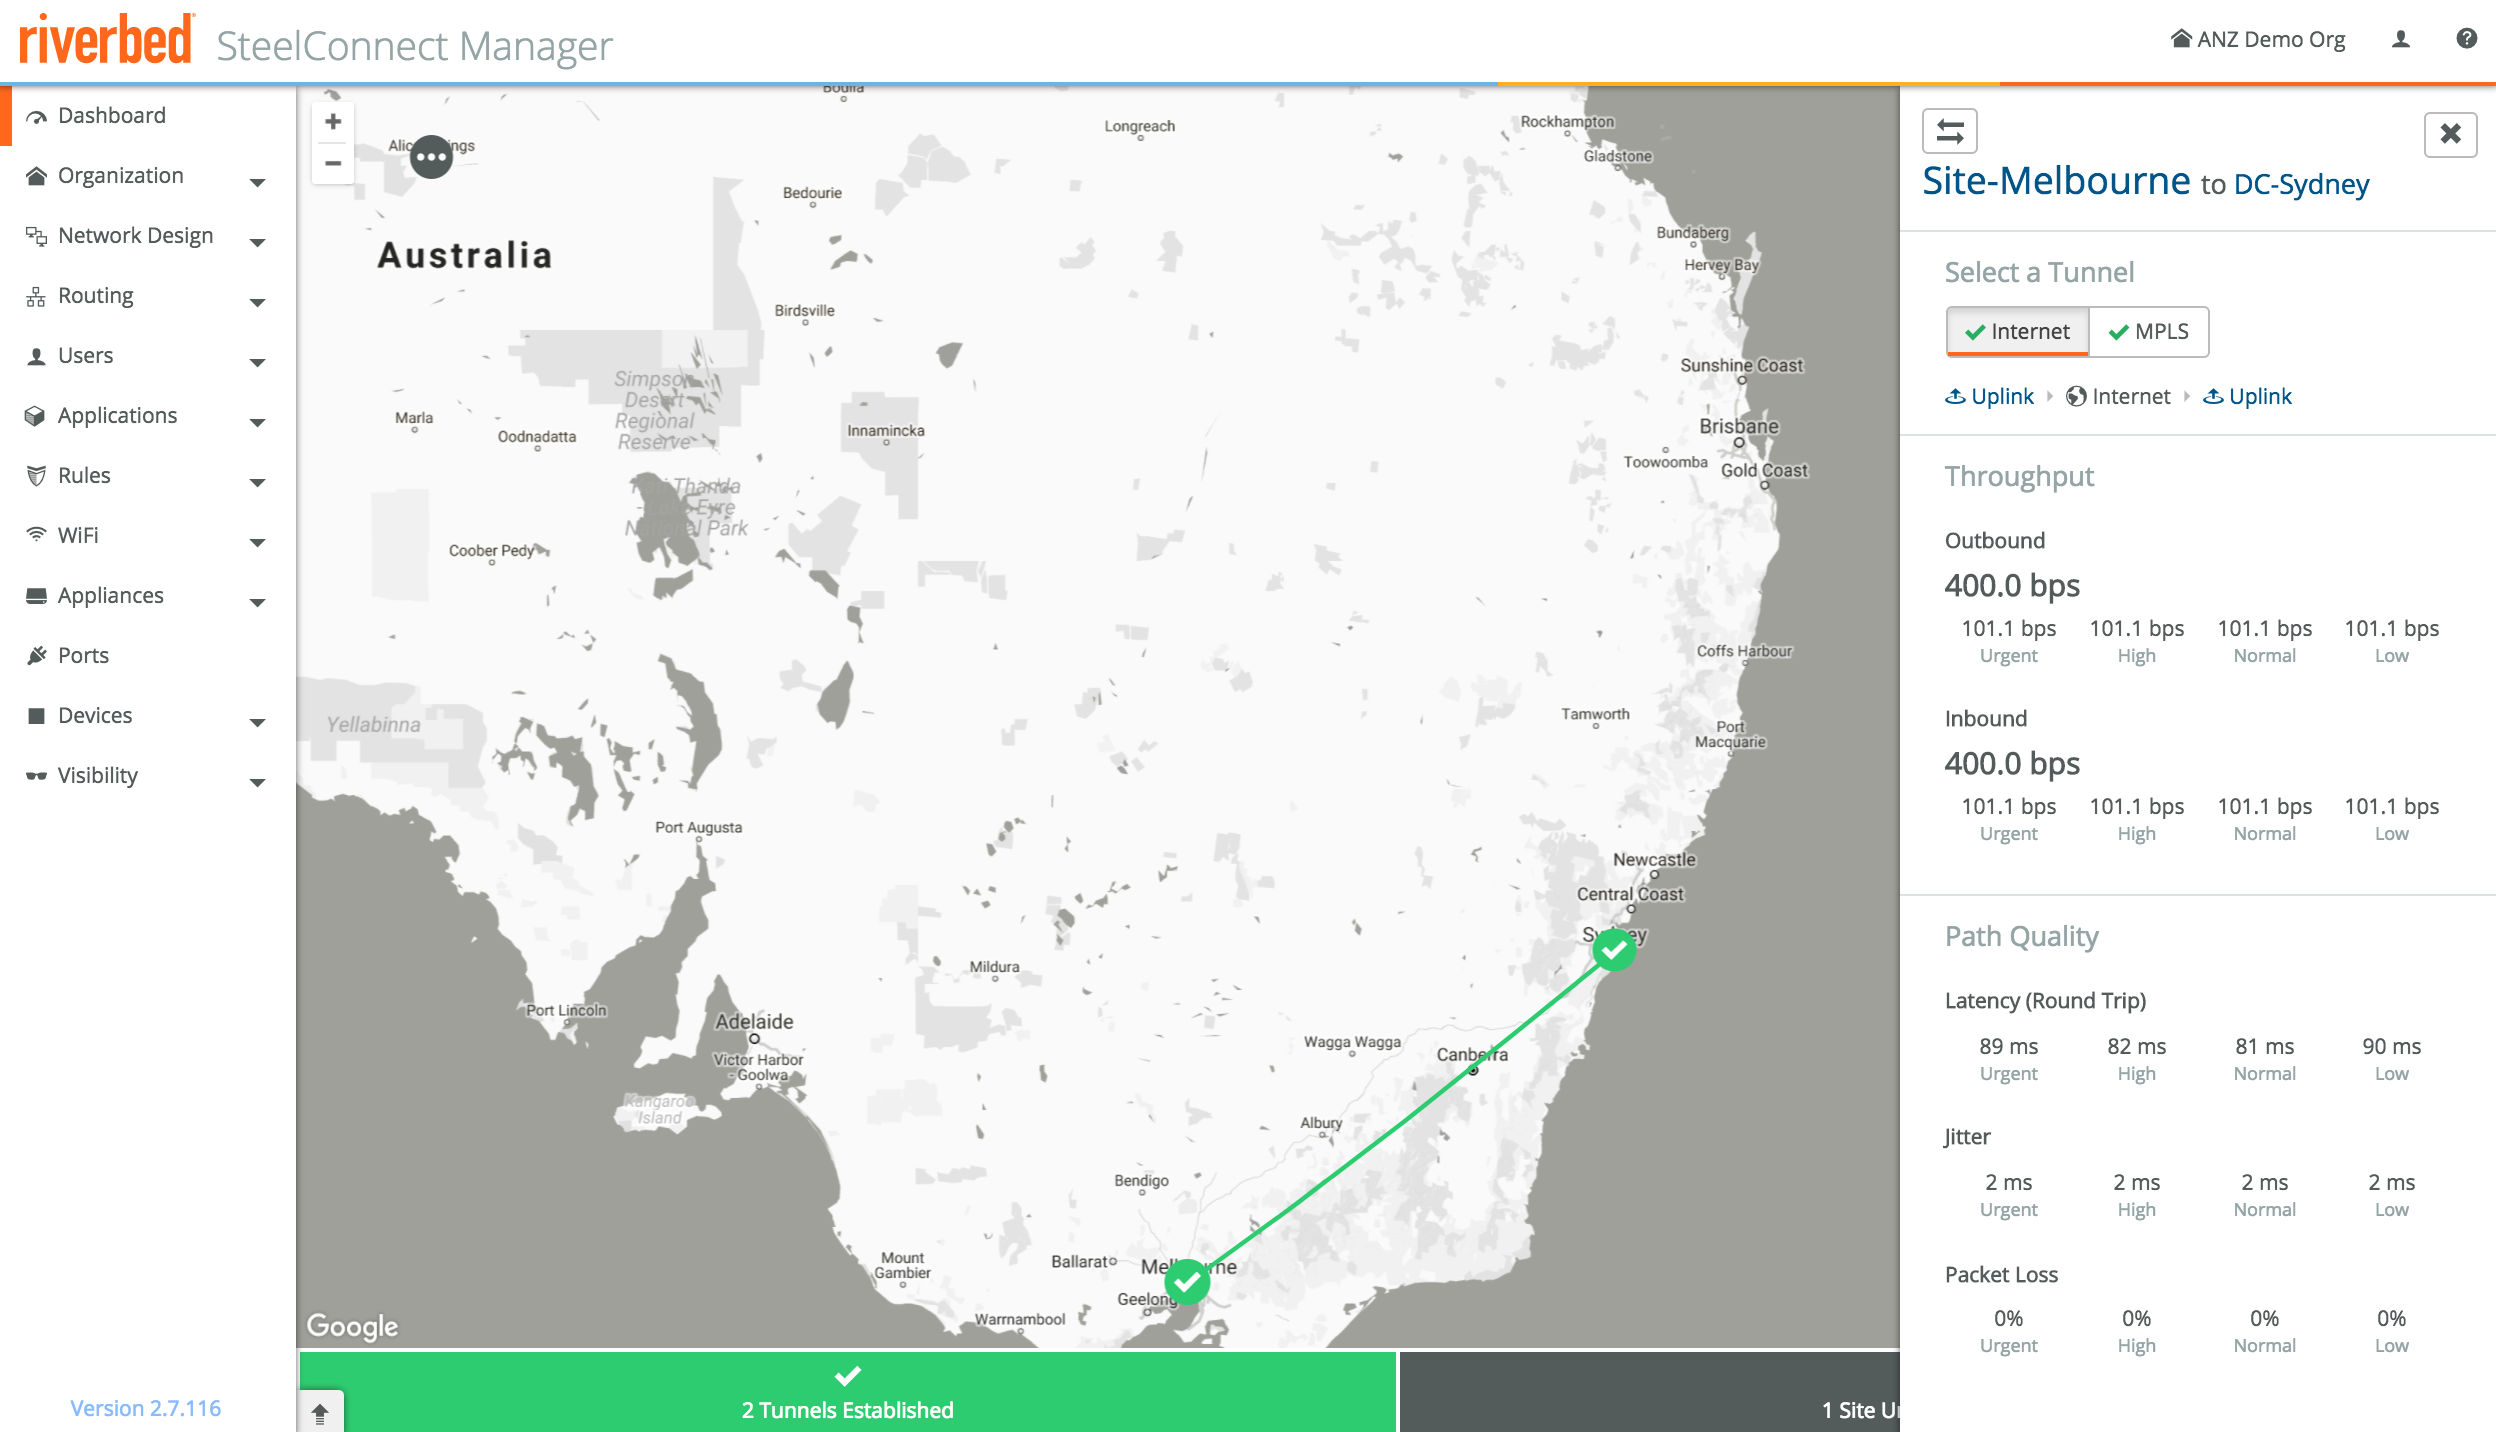

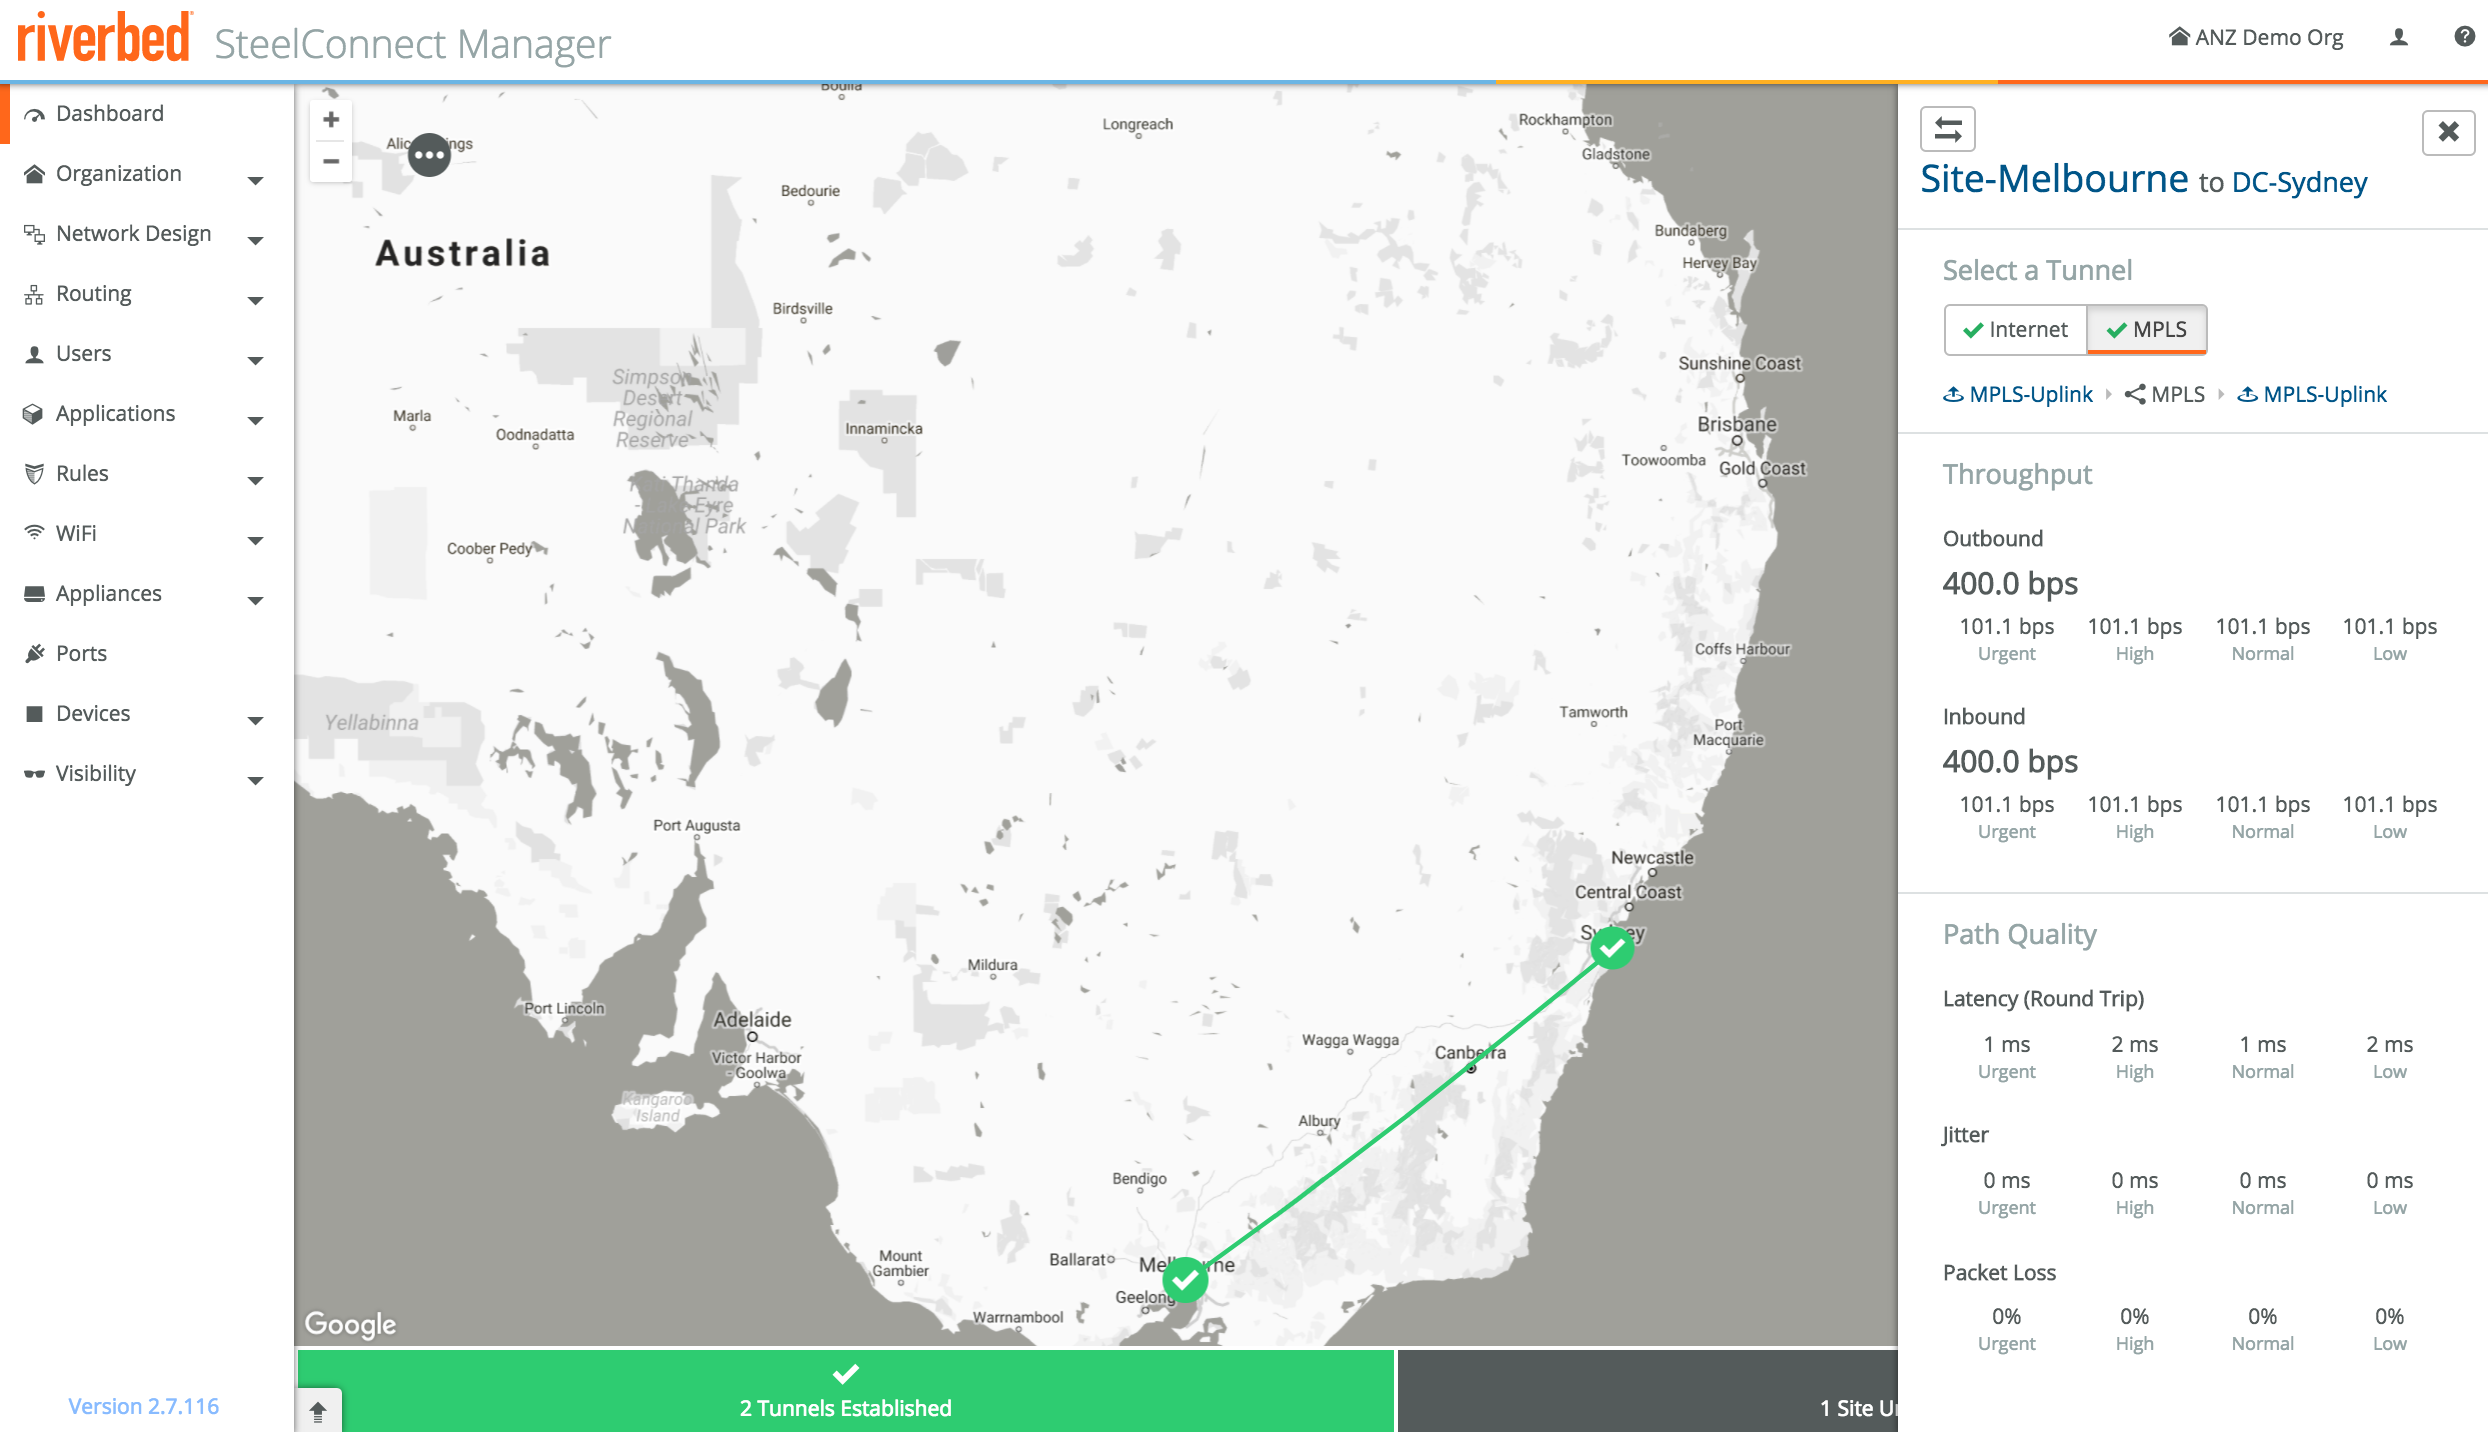

If you don’t see the appliance come online, make sure TCP/443 or TCP/3900 outbound traffic is allowed as per the port requirements.
If the appliance comes online but the VPN tunnels aren’t established, make sure UDP/4500 inbound is allowed for that appliance. You can change the port, or use leaf mode so the site will initiate the VPN tunnel setup.
This was a lot to cover in one blog post, hope you made it to the end!
It’s good to have the foundation right before moving on to the more advanced topics, I promise the next few posts will be more concise. Next up is the integration with Amazon AWS & Microsoft Azure, stay tuned!
As mentioned earlier, if you want to test SteelConnect, head here for a free trial you’ll be up and running within minutes.
The complete series:
Part 1: SD-WAN for the masses
Part 2: Getting started with SteelConnect]
Part 3: Native Amazon AWS & Microsoft Azure integration
Part 4: Intelligent traffic steering
Part 5: SD-LAN
Part 6: Application visibility
Part 7: REST API
Part 8: SteelHead integration
