Disclaimer: I work for Brocade, all views and expressions on this blog are entirely my own and don’t necessarily reflect the views of my employer.
Scalability is key when designing a data centre or cloud architecture. Over the last few years layer 2 scale-out architectures have been very widely deployed, with various vendors providing their own solution for a high-performance data centre network.
Brocade for example came out with an Ethernet fabric architecture called Virtual Cluster System (VCS) back in 2010. VCS allows customers to have up to 48 switches with all links (10G/40G/100G) active, managed as a single entity with zero touch provisioning.
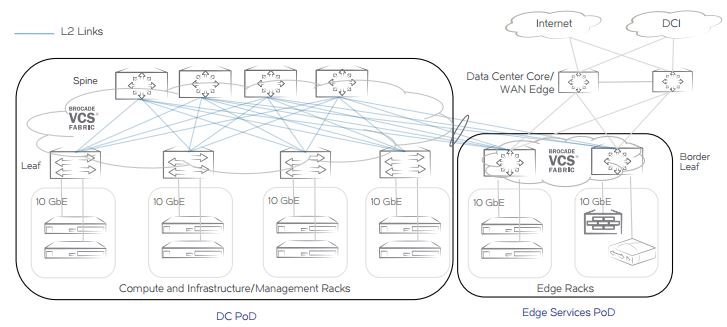
This worked well and is still the easiest way to deploy a data centre network architecture for most customers, using a L2 Clos architecture like shown below.


Over the last years the industry has seen an enormous increase in east-west traffic patterns in the data centre due to an increase in workloads, IP Storage, VM mobility resulting in an increase in the requirement for horizontal scale-out of the network.
For large customers like cloud service providers, the layer 2 scale-out architecture isn’t flexible or scalable enough as they need to scale beyond the supported limits of layer 2 fabrics and need to be able to support and manage up to thousands of tenants, all with different requirements.
Facebook published a great article about how they were tackling the fabric issue in late 2014, and how they were using data centre fabrics, or IP Fabrics in order to allow larger scale-out.


Brocade has recently released NOS 7.0 software for their VDX platform, which allows customers to easily configure IP Fabrics and use layer 3 scale-out in their data centres by using open standards like BGP, multi-tenancy and multipath routing for optimum use of links with ECMP as the underlay.
With the use of BGP EVPN, controller-less network virtualization can be implemented using automatic VTEP discovery for example (using VXLAN). Other overlay technologies are supported as well, with support for controller-based network virtualization using the VMware NSX controller coming out shortly.
Brocade has also released an automation tool for configuring large scale IP Fabrics, called Brocade Workflow Composer (BWC) and make deployment as easy as possible. I’ll probably cover this in a future post.
Just to be clear, in no way will IP Fabrics replace VCS Fabrics, which still is the easiest way to build a layer 2 data centre fabric. For customers that need a larger fabric due to MAC scaling, or using > 48 switches per site, an IP Fabric would be the best way forward.
The Brocade Data Center Fabric Architectures whitepaper provides a great overview of both VCS & IP Fabrics and which one is applicable when. Worth a read!
I won’t go into all the design details and options, the whitepaper above does a way better job of covering all that.
My first IP Fabric I’ll cover the basic steps for installing an IP Fabric, and part 1 will only cover configuring the underlay. Part 2 will focus on the overlay with BGP EVPN and all the cool things you can do with that. Consider this a primer.
Disclaimer: These articles don’t cover all the options and scenarios, please refer to the configuration guide and release notes for all the fancy details that might be applicable and useful to your environment.
What’s required to get a basic IP Fabric up and running? This is anything but an exhaustive list, the steps are roughly as follows:
- Make sure you run at least NOS 7.0 on a VDX, to enable all IP Fabric related features. The VDX 6740, 6940 and 8770 are all supported. For the sake of this blog post I’m assuming that a vLAG pair has been configured where needed.
- Configure Leaf/Spine IP addressing
- Configure BGP IPv4 configuration as underlay
- Configure BGP EVPN for the controller-less VXLAN overlay (stay tuned for part 2, in which this will be covered)
We could use either eBGP or iBGP for the leaf/spine peering. We’ll go for eBGP, as it’s probably the more common design. iBGP peering with route reflectors is certainly supported although not covered in this article.
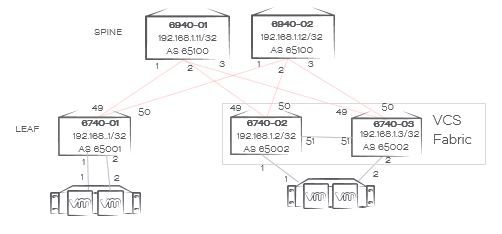
In our case with eBGP we’ll have a unique private BGP AS number per ToR rack switch (pair) and a common private BGP AS number for the spine switches as per the topology below.
The network topology


We’ll simulate that we have two compute racks, one with a single-homed server (rack 1) and one with a dual-homed server (rack 2). Everything’s physically connected in a leaf-spine topology, with rack 2 using a vLAG pair for easier management and the option to dual-home servers for HA.
VCS automatically creates a L2 fabric when you plug in a cable between two VDXs. Now that the L2 domain is limited to the rack each ToR switch (pair) becomes a vLAG pair. All connections coming out of a rack are L3 only, and you want to make sure your VDXs don’t form a VCS Fabric outside of the rack.
A requirement is to have at least each spine switch set to a unique VCS ID (don’t set it to 1, that’s the factory default) so whenever a new leaf switch connects they won’t form a L2 Fabric automatically on VCS 1.
For ease of use we’ll leave the leaf switches in VCS 1, and use RBridge ID 1 (and 2, in case of the dual-homed server rack). This makes automation of leaf switches way easier as basic configuration is the same regardless of the rack number. The choice of VCS ID is yours, you could use anything really. I often use RBridge ID 1 and 2 in an IP Fabric, makes configuration of multiple racks easier with copy/paste…
If you’re new to the concept of IP Fabrics, every VLAN will be terminated at the ToR switch(es) with the ToR switch acting as the default gateway. There’s no need for any VLAN configuration, as these are only used for L3 transport and require little configuration compared to the leaf switches.
In this example we’ll have VLAN 10 and VLAN 20. We can reuse them in every rack, trying to keep our leaf switch configuration as consistent as possible. It makes configuration easy, however every rack will obviously need different IP addresses for those VLANs.
Let’s assume we have the following IP addresses, using 10._vlan._rack.1/24 as our addressing scheme:
<th class="column-2">
  VLAN 10
</th>

<th class="column-3">
  VLAN 20
</th>
<td class="column-2">
  10.10.1.1/24
</td>

<td class="column-3">
  10.20.1.1/24
</td>
<td class="column-2">
  10.10.2.1/24
</td>

<td class="column-3">
  10.20.2.1/24
</td>
<td class="column-2">
  10.10.3.1/24
</td>

<td class="column-3">
  10.20.3.1/24
</td>
Without any overlay technology, workloads that require L2 adjacencies would be bound to its own rack. An overlay transport protocol that extends layer 2 over layer 3, like VXLAN, can be used to overcome this limitation. This can be done with EBGP VPN or using a VMware NSX controller, which I’ll cover in part 2 of this blog post.
**Leaf/Spine IP addressing
** Let’s start with the addressing of the switches. In order to make our network design as easy to deploy as possible, we’ll use a unique loopback address per switch, and _ip unnumbered _for the eBGP peering on the physical link. This beats having to use /31 addresses on every link, which can be an addressing nightmare if you have a large data centre.
In our case we will use the 192.168.1.x/32 subnet for this.
There are a few things to note when multihoming servers, like with rack 2 in our example. This page in the configuration guide provides more detail, please read it first if you have a dual-homed setup. For example, by default BGP uses the lowest numbered loopback IP as the router ID. In a vLAG configuration, both switches need to have the same loopback IP so you need to set a router ID to distinguish the route updates, as we’ll do in the example below for rack 2.
6740-01 (rack 1)
6740-02 & 6740-03 (rack 2)
6940-01 (spine 1)
6940-02 (spine 2)
You can verify that it works, and that the neighbors can see each other by using show interface . The switches use LLDP to broadcast and discover the remote address.
BGP IPv4 configuration
Now that we’ve configured the IP addresses for our switches, it’s time to get to the BGP configuration for the underlay. The leaf switches only need to peer with the spine switches, there’s no need for any peer configuration between leaf switches.
Every rack has their own private AS number:
- Rack 1: 65001
- Rack 2: 65002 (same on both switches in a vLAG pair)
- Spine switches: 65100
We need to configure the local-as and remote-as, as well as ebgp-multihop with a value of 2 to allow for the eBGP peering to happen successfully.
For leaf switches to accept BGP updates we need to configure neighbor allowas-in. This disables the AS_PATH check function from rejecting routes that contain the recipient BGP speaker’s AS number.
6740-01 (rack 1)
6740-02 & 6740-03 (rack 2)
6940-01 (spine 1) & 6940-02 (spine 2) - same configuration
You can confirm if it is working correctly by checking any of the switches and using the show ip bgp summary and show ip route command.
On the 6940-1 spine switch you can see that we have two links to get to 192.168.1.2, so you can see that despite the overlapping Loopback 1 address on RB1 & RB2 in rack 2 everything works as planned. Test it by shutting down both uplinks on 6740-01 and all traffic will flow via 6740-02.
If you would add a VLAN 10 now on 6740-01, and a corresponding VE 10 you will see that that gets redistributed into BGP and is available on all leaf switches.
That concludes part 1 of the IP Fabrics series, focusing on the initial configuration steps and the BGP underlay. The next installment will be about BGP EVPN and configuring the overlay to allow for multi-tenancy and workload mobility. If you can’t wait, enjoy reading the configuration guide and if you’re keen on automating this, grab yourself a copy of Brocade Workflow Composer.
